In autumn 2023, I completed the Code First Girls Degree in Software Engineering; a free(!) intensive 16-week long course designed to help women/non-binary people enhance their coding skills, or learn them all from scratch, and secure a job in tech. I was in the, "learn them all from scratch" camp, which only added to the intense nature of the course...shocking I know. However, after a lot of work (please see "Chess Battle!" project for reference/proof), applications, pain and tears later, I secured a job as a Software Developer at Sensational Systems Ltd. in December 2023. Since becoming an actual, real-life Software Developer, my interests quickly expanded to include electronics, Raspberry Pis, Arduinos, networking and ethical hacking. As much as I love software, arguably my first and unwaning love was for hardware. Therefore, exploring the many capabilities of these boards, processes and topics has allowed me to happily combine software and hardware. And, for me, this is where ethical hacking comes in. To be able to hack into things, it's common to need a good understanding of the physical world/hardware around you as well as networks and the software tools needed to make sense of the information collected.
I'm still at the beginning of my ethical hacking education and honestly, I've found it quite an intimidating topic to even begin to comprehend. Not to mention, it's an extremely male space. I really wish that didn't bother me...I wish that didn't make a space more or less intimidating, but it does because...well the patriarchy etc. So, I wanted to write about my experience so far, try and, hopefully, encourage anyone, regardless of gender or experience level, to give ethical hacking a go and learn more about how different hardware connects, communicates and the low-level techniques and software tools used to make sense of it.

source: https://www.spoilerfreemoviesleuth.com/2023/08/HackersUHD.html
So why Ethically Hack Anyway?
Firstly, let's establish what ethical hacking is:
"Ethical hacking is the use of hacking techniques by friendly parties in an attempt to uncover, understand and fix security
vulnerabilities in a network or computer system." (https://www.ibm.com/think/topics/ethical-hacking)
vulnerabilities in a network or computer system." (https://www.ibm.com/think/topics/ethical-hacking)
It's important to emphasise the 'ethical' part of ethical hacking, as well as the fact that it is to be used to highlight vulnerabilities in your own network/computer or a network/computer that you have permission to hack into.
As stated in the quote above, the main aims of ethical hacking are to, 'uncover, understand and fix' vulnerabilities. In doing this we get to know our own systems at a 'low-level', highlighting any security threats and allowing us to more efficiently resolve issues. Also...it's fun and you do feel pretty cool, like you're playing a part in Hackers (1995), "Hack The Planet!".
Uncover, Understand and Fix
So how exactly do you begin to 'uncover' potential vulnerabilities and begin to understand them well enough to find a fix? Of course, there are many ways, but I'll talk about the ones that I've had some experience with.
DISCLAIMER: As we all know, the world of tech has so many acronyms, tools and software applications, it's kind of wild. And the world of ethical hacking is no different. So, if you're like me, and the first impression of ethical hacking is, "woah these are a load of words I don't know...", then you're not alone. For me, YouTube was a real help in combating this. Here are a few hacking/electronics/networking YouTubers that I'm a big fan of:
- Talking Sasquatch
- Talking Sasquatch
The information that they have on their channels is great and their tutorials are very informative, well shot and well explained. I've learnt the most from Talking Sasquatch, but more on him and his videos later.
P.S. FYI: whenever I use the word 'networking' in this text, I'm referring to the computer/internet/infrastructure kind, not the LinkedIn kind (unless otherwise stated).
Kali Linux

Source: https://shorturl.at/x4Qn5
Kali Linux is a Linux-based operating system that is specifically designed for penetration testing (PEN-testing) and comes with a variety of open-source networking and hacking tools pre-installed. You can easily try out Kali Linux on a Virtual Machine using something like AWS, Digital Ocean or an open-source alternative like VirtualBox or ProxMox. Also, if you have an old computer somewhere, you can create a bootable USB (Balena Etcher is a good opern-source disk writer) and use that to install Kali Linux, or any Linux OS for that matter. This is particualrly useful if your old computer no longer supports newer versions of apps or browsers. For example, I have an old Intel-based MacBook Pro from 2015 that I could no longer update; sites like Netflix stopped loading altogether. So, I loaded Ubuntu (commonly known as the most Mac-like Linux OS) and everything just worked! So, it's a good way to extend the life of a computer and reduce e-waste.
Small tangent 1/3 – I have to say, since using Linux for work, I've really come to appreciate open-source operating systems and software. It's just...well it's just nice to not have to pay for stuff!
The Command Line
If you're still not vibing with the idea of using Kali Linux, or Linux in general, don't worry, you don't need to have experience with a Linux OS to practice ethical hacking. However, it's definitely worth trying out if it's something you're interested in pursing. At the very least, it's good to get comfortable with using the terminal/command line, on any operating system. Here are a few key networking/logging related commands that you can try yourself, just open up your terminal and fire away:
1. sudo netstat -tnlp
This command gives you an overview of the current network status. Luckily it's quite similar across all operating systems but here is a link to a site that lists all of the commands in detail grouped by OS. How can this be used? Well, for those who are familiar with MySQL (or anything that connects to your local network for that matter), have you ever come across a time where MySQL just would not connect for some reason? You've checked everything, the logins are correct, you're on your last nerve and it just isn't working. Well, that could be because there is an open port or ongoing process running in the background that needs to be killed off. The netstat command will list these processes and then you can see if there are any ongoing on the port that you are using to connect MySQL to. Once you find it, and you are sure that it is it, you can kill the process and try to reconnect. There are so many uses for this tool, but that was one of the first situations that I used it in.
PLEASE NOTE: be careful when killing off processes as it's quite easy to kill of crucial processes by mistake. Not speaking from experience of course...ahem...moving on!
2. journalctl -f (Linux) / log stream (Mac) / wevtutil qe System /f:text /c:10 /rd:true (Windows)
These commands allow you to see the raw log outputs from your system, which can be extremely useful when debugging. I regularly use this command to see debug and info logs on a Virtual Machine. This has helped me solve many annoying code puzzles and I'm now a great advocate for using some kind of logging system in a codebase. Here is a more detailed guide for using the journalctl command on Linux if you're interested. Mac also has a logging app called Console and Windows has Windows Event Viewer where you can see the same logs in a more user-friendly GUI.
3. sudo nano file_name.txtHave you ever come across a file that your computer is just like, "no, you're not allowed", or perhaps it's a file type that you can't open? If so, it's more than likely that there will be some way to access it in the terminal. By the way, in case you didn't know, the sudo part of the command basically means 'admin' or 'root', and will ask you to enter your main password before running the command. sudo is used to gain admin access to files. The nano part of the command refers to the name of a text editor that can be used to read and edit files directly in the terminal. There is another popular text editor called Vim that you might have heard of. Instead of 'nano' just use 'vim' in its place. I will say that I personally find Vim commands much harder to use and the user-interface isn't as great. However, Vim has a very strong cult following among the die-hard Linux nerds, so don't be surprised if you get some passionate, 'Oh Vim is soooo much better that nano!' exclamations. Also, Vim and Nano aren't the only text-editors in town. Ultimately, just use whatever text editor is best for you!
4. ssh username@ip_address_here
When (ethically) hacking into things, it's common to need to remotely log into a device. This is particularly useful if the device, such as a small single board computer, or server without a monitor, doesn't have a way to display the current status of the system. To do this, we can used something called 'SSH' or Secure Shell. It’s one of those things that’s not hard but you just need a few goes at doing it to get your head around it. Here is a good (and recent) guide on how to get started, and good, with using SSH:
Once you unleash this power it will be hard to remember life before it!
Hacking and Networking Software/Tools
I mentioned before that Kali Linux comes pre-installed with some useful software tools. It's also important to say that because these are all open-source, a lot of them can be downloaded onto any OS. Here are a few of those handy software tools that are worth checking out:
1. Wireshark
Wireshark refers to its software as, "The world's most popular network protocol analyzer". Whether that's true or not, I don't know, but what I can say that it is always the app that is mentioned when talking about analysing networks. It's a very powerful tool and one would be the first go-to hacking software recommendation purely because it's so widely used and there's a lot of good tutorials out there for it. I will say that I did find it a bit of a steep learning curve getting to grips with the commands and interface, I'm still getting to grips with it, but it is very useful and I'm already integrating it into my day-job.
2. Metasploit
We have another grand claim; Metasploit is the "world’s most used penetration testing framework". Again, when you hear about PEN-testing, it's not long until you hear about Metasploit. Essentially, it is used to make sense of the results from logs and network analyses. It uses many techniques to do this, but one of the ways is comparing vulnerabilities against the CVE (Common Vulnerabilities and Exposures) database. This helps a series of logs and PEN-testing results not only gain much needed context, but there is also a severity scale which each vulnerability is measured against. You might be familiar with anti-virus software labelling vulnerabilities as severe (red), moderate (yellow), low (green); they are able to be categorised this way because they will have been compared against a CVE database or similar.
3. Hashcat
Hashcat is officially a "password recovery tool", but really it's one of the most common password cracking tools. It uses a set of predetermined commands to compare a binary file against password dictionaries, which are essentially massive lists of billions of common passwords and password patterns. One of the most popular list of common passwords is a file called 'rockyou.txt'; so, if your password is in this list, it's probably a good idea to change it. These binary files can be converted from .pcap (packet capture) files, also commonly known as 'handshakes'. These handshakes and packets can be recorded using various tools, one of which is Wireshark (we've come full circle), and tools like the Raspberry Pi based Pwnagotchi which I'll go into more later on. You might be asking, 'but what are packets exactly?'. Packets are defined as, "a small segment of a larger message. Data sent over computer networks, such as the Internet, is divided into packets" (for more detailed information, see here). Wait, what is that you ask? But why are they called packets? I know, I wondered that too, here is the answer.
Raspberry Pi based Hacking Tools
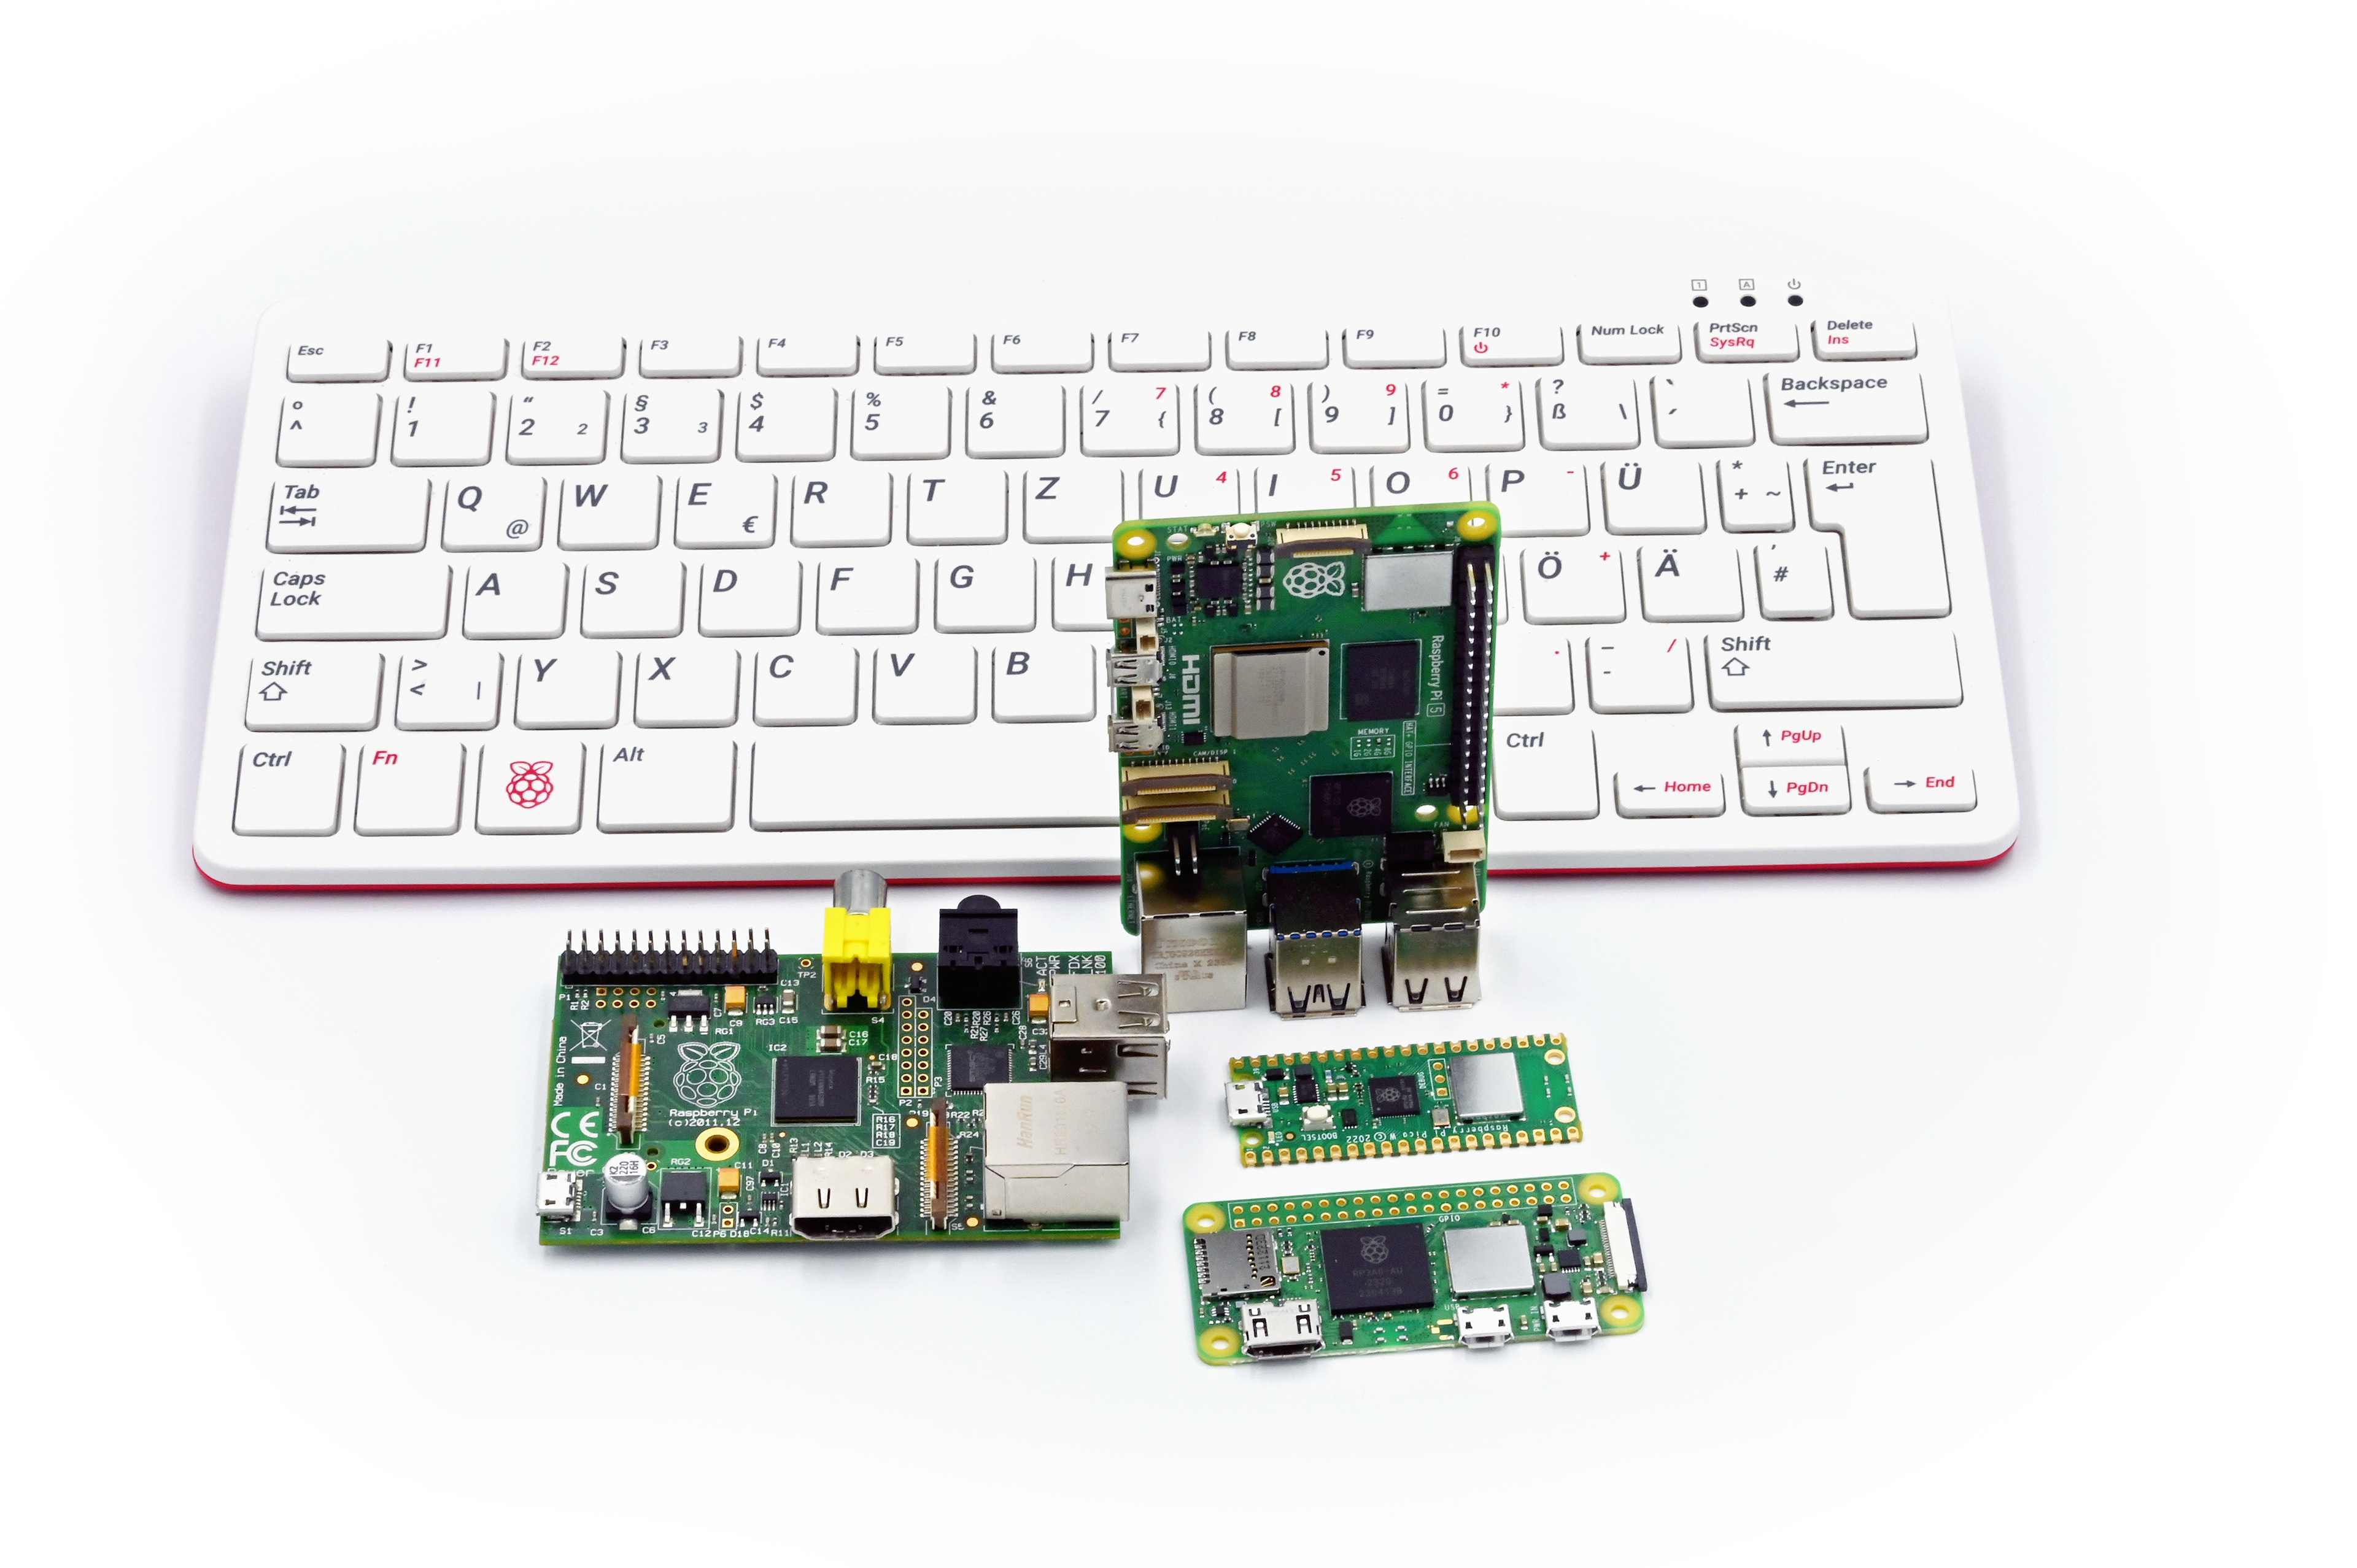
Source: https://upload.wikimedia.org/wikipedia/commons/9/9c/Raspberry_Pi_1%2C_Pi_5%2C_Pi_400%2C_Zero_2_and_Pico.jpg
You may have heard of a Raspberry Pi...well we've all heard of a raspberry pie, but it's not the one you eat (at least I hope not), it's the one that's a brand name that makes a series of small single board computers. Again, I hear you cry, but why call it a 'Raspberry Pi'?
Well, you're in luck because I have the answer:
"...all the leading technology giants are named after fruits and the raspberry was chosen for its bold colour, combined with Pi as a play on the word Python."
"...all the leading technology giants are named after fruits and the raspberry was chosen for its bold colour, combined with Pi as a play on the word Python."
Mini tangent 2/3 - after reading this reasoning behind the name, I was just reminded of how random naming in general can be. Also, since the Raspberry Pi, there have been many pi-like boards that have similarly fruity/foody names. Such as Banana Pi, Orange Pi, Onion Omega2+ and, my personal favourite, LePotato (no, I'm not joking, please see here for full nutritional information).
In the image above, you can see a variety of Raspberry Pi boards, all have different processing power and different use cases, but all are single board computers (with the exception of the smallest one in the picture, the Pi Pico, which is known as a micro-controller). I could go into a lot more detail about all of the different boards, but for the purposes of this blog, we'll focus on the Raspberry Pi Zero W (and the newer Pi Zero 2W). For reference the Pi Zero W is the second smallest board in the picture above.
Pwnagotchi
The Pi Zero W, especially considering its size, is actually a really powerful computer. For example, you can run a verison of Kali Linux on it! I should also mention, that on the inside, Raspberry Pis are all just mini Linux-based machines, the more you know! There are so many amazing projects that this tiny computer can be used for, but one popular one among ethical hackers is the Pwnagotchi:
"Pwnagotchi is an A2C-based “AI” powered by bettercap and running on a Raspberry Pi Zero W that learns from its surrounding WiFi environment in order to maximize the crackable WPA key material it captures (either through passive sniffing or by performing deauthentication and association attacks). This material is collected on disk as PCAP files containing any form of handshake supported by hashcat, including full and half WPA handshakes as well as PMKIDs."
Now, that's a load of words, but hopefully you recognise some of them from earlier! In simpler terms, the Pwnagotchi is an AI-powered software loaded onto a Pi Zero W (the 'W' standing for WiFi) that uses network mapping (known as nmap commands) to explore the WiFi networks around it and collect 'handshakes' (essentially responses, the Pwnagotchi says 'Hi!', and the WiFi says, 'Hi, who are you?' back). The Pwnagotchi records these interactions in the form of PCAP (Password Capture) files and stores them on an SD card, which lives in a slot onboard the Pi Zero W. So, the Pwnagotchi is a no-so-innocent Tamagotchi, recording as much information as possible, searching for opportunities to intercept, kind of like a Personal Investigator. After it has finished its investigating, an ethical hacker extracts the files from the SD card and then processes them i.e. makes sense of them (remember these .pcap files are binary files and idk about you but I can't read raw binary) using software such as Hashcat. We love a call back! After handing over the .pcap files to the very clever cat, you may, or may not, get back some cracked or partly-cracked passwords. I can't say that using Hashcat has been particularly easy but luckily there are a good lot of tutorials out there. Here is one that I thought was helpful.
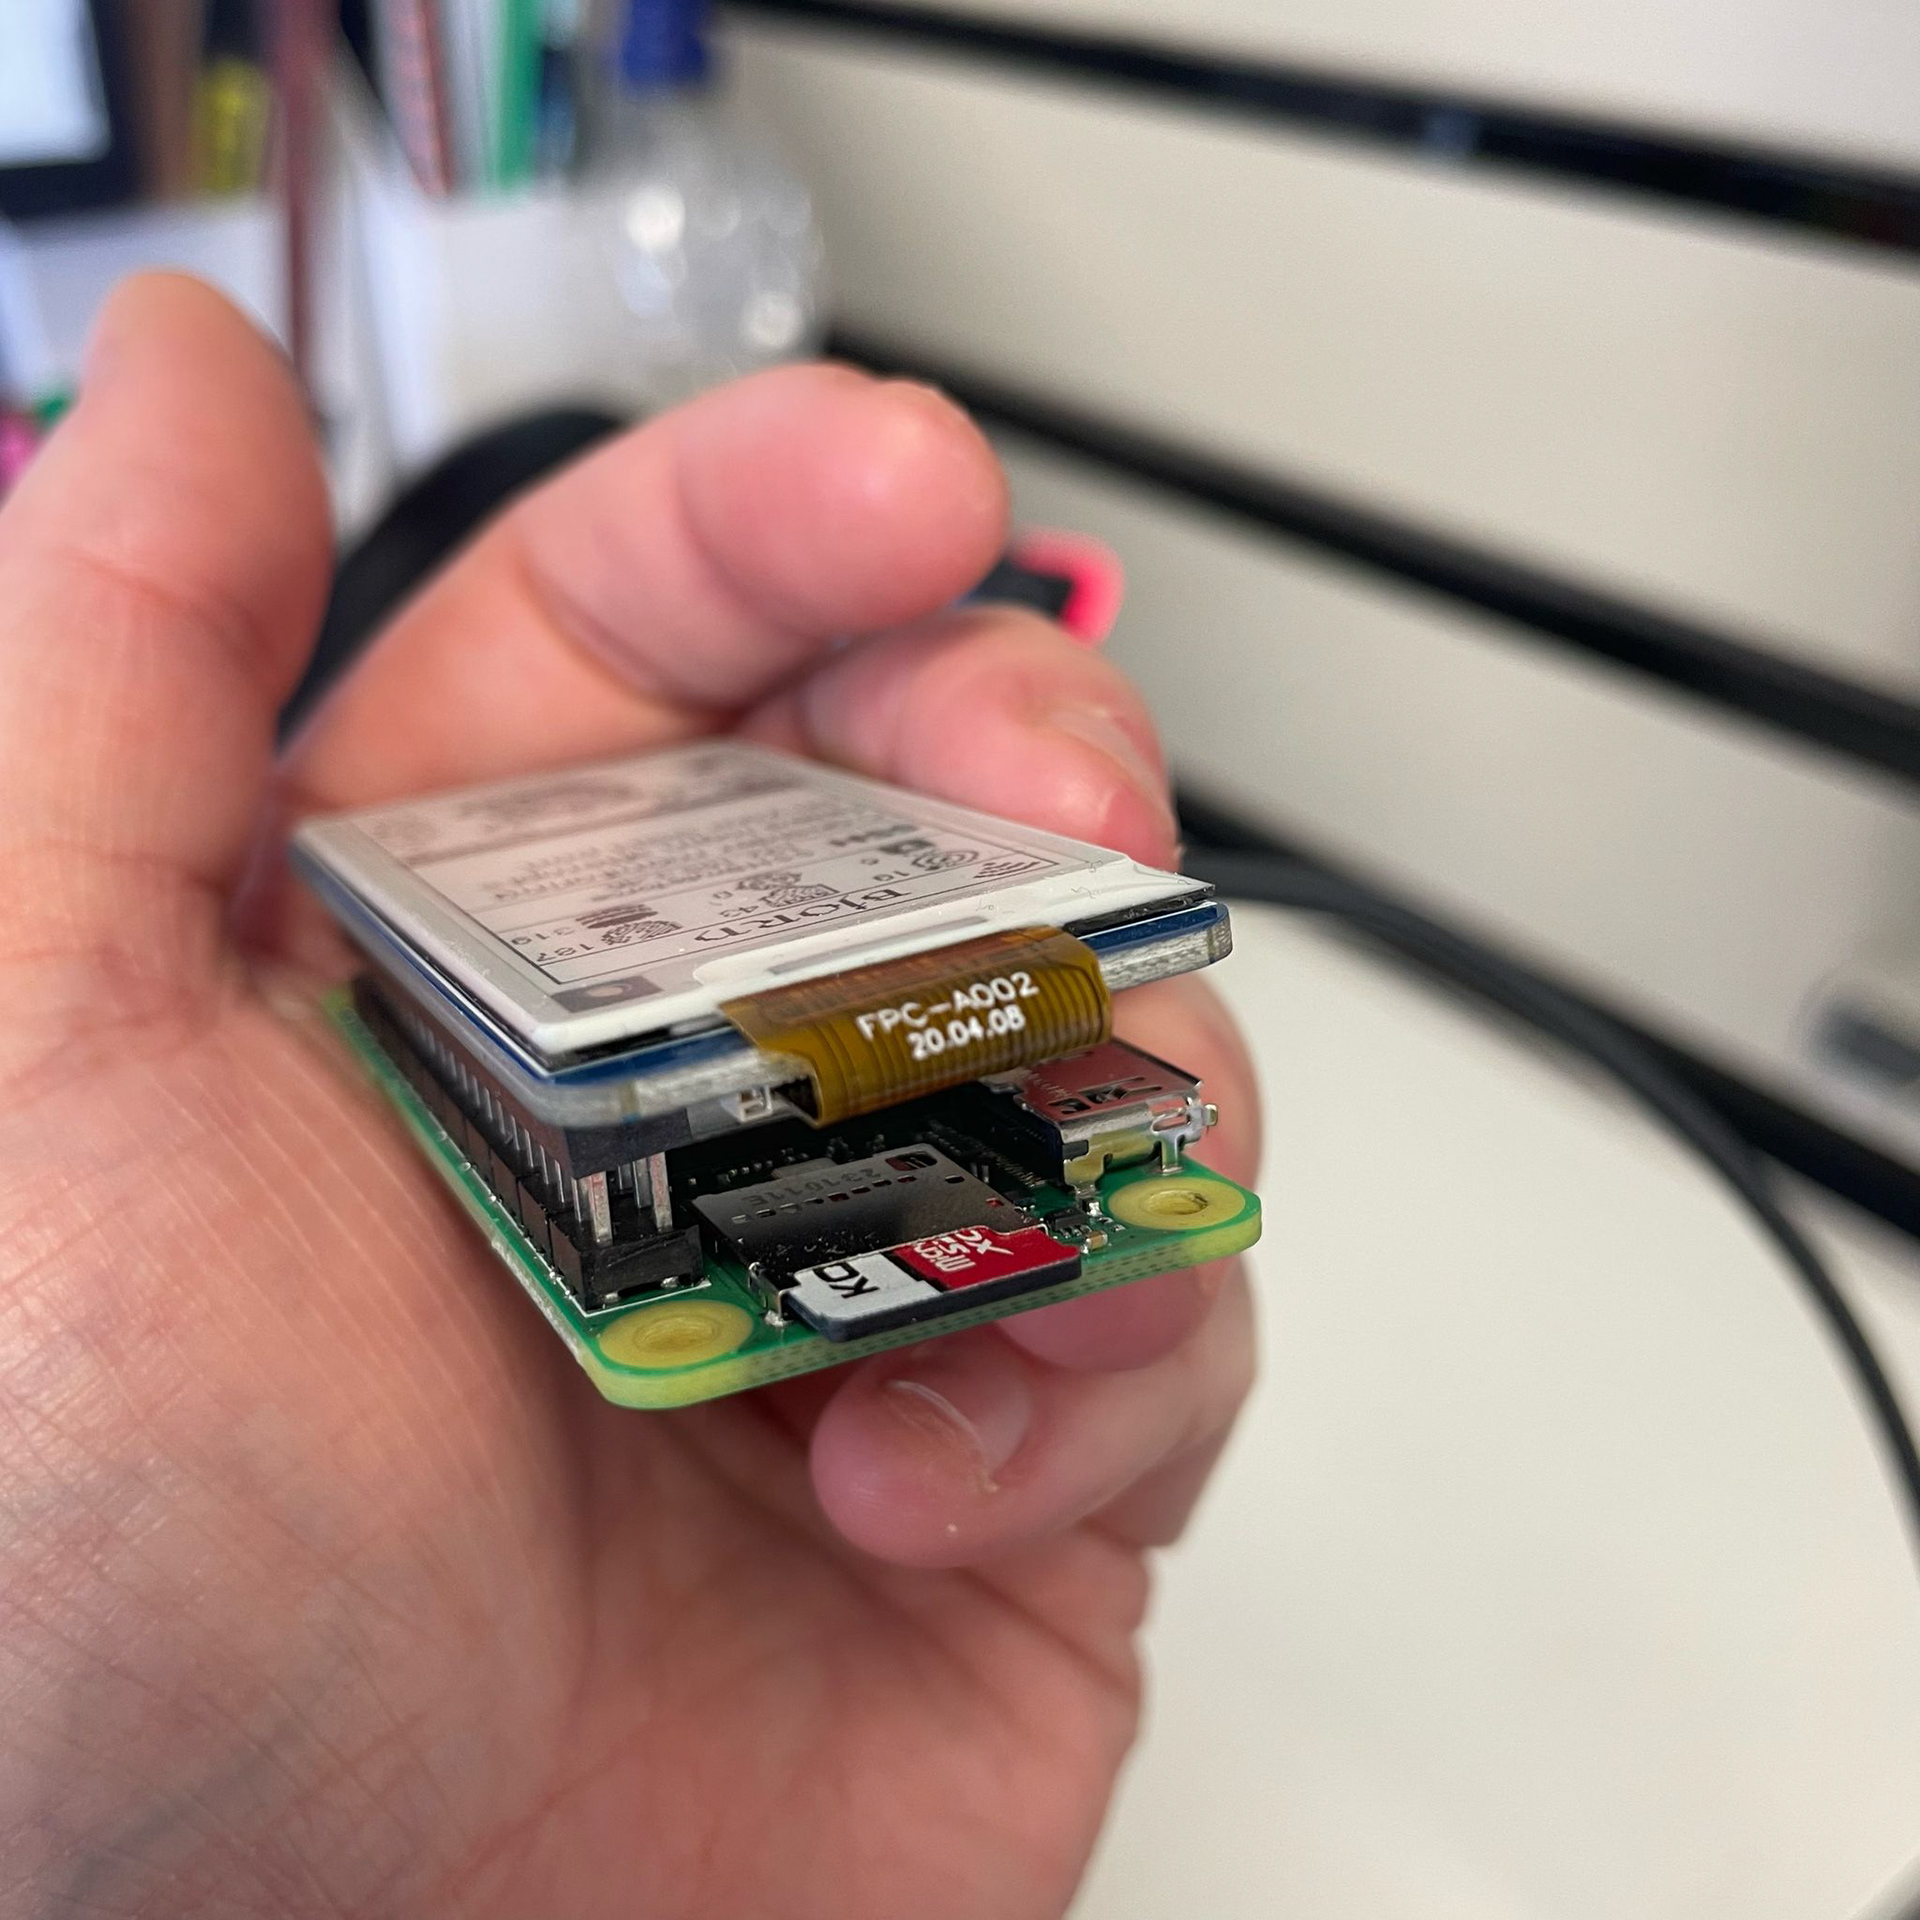
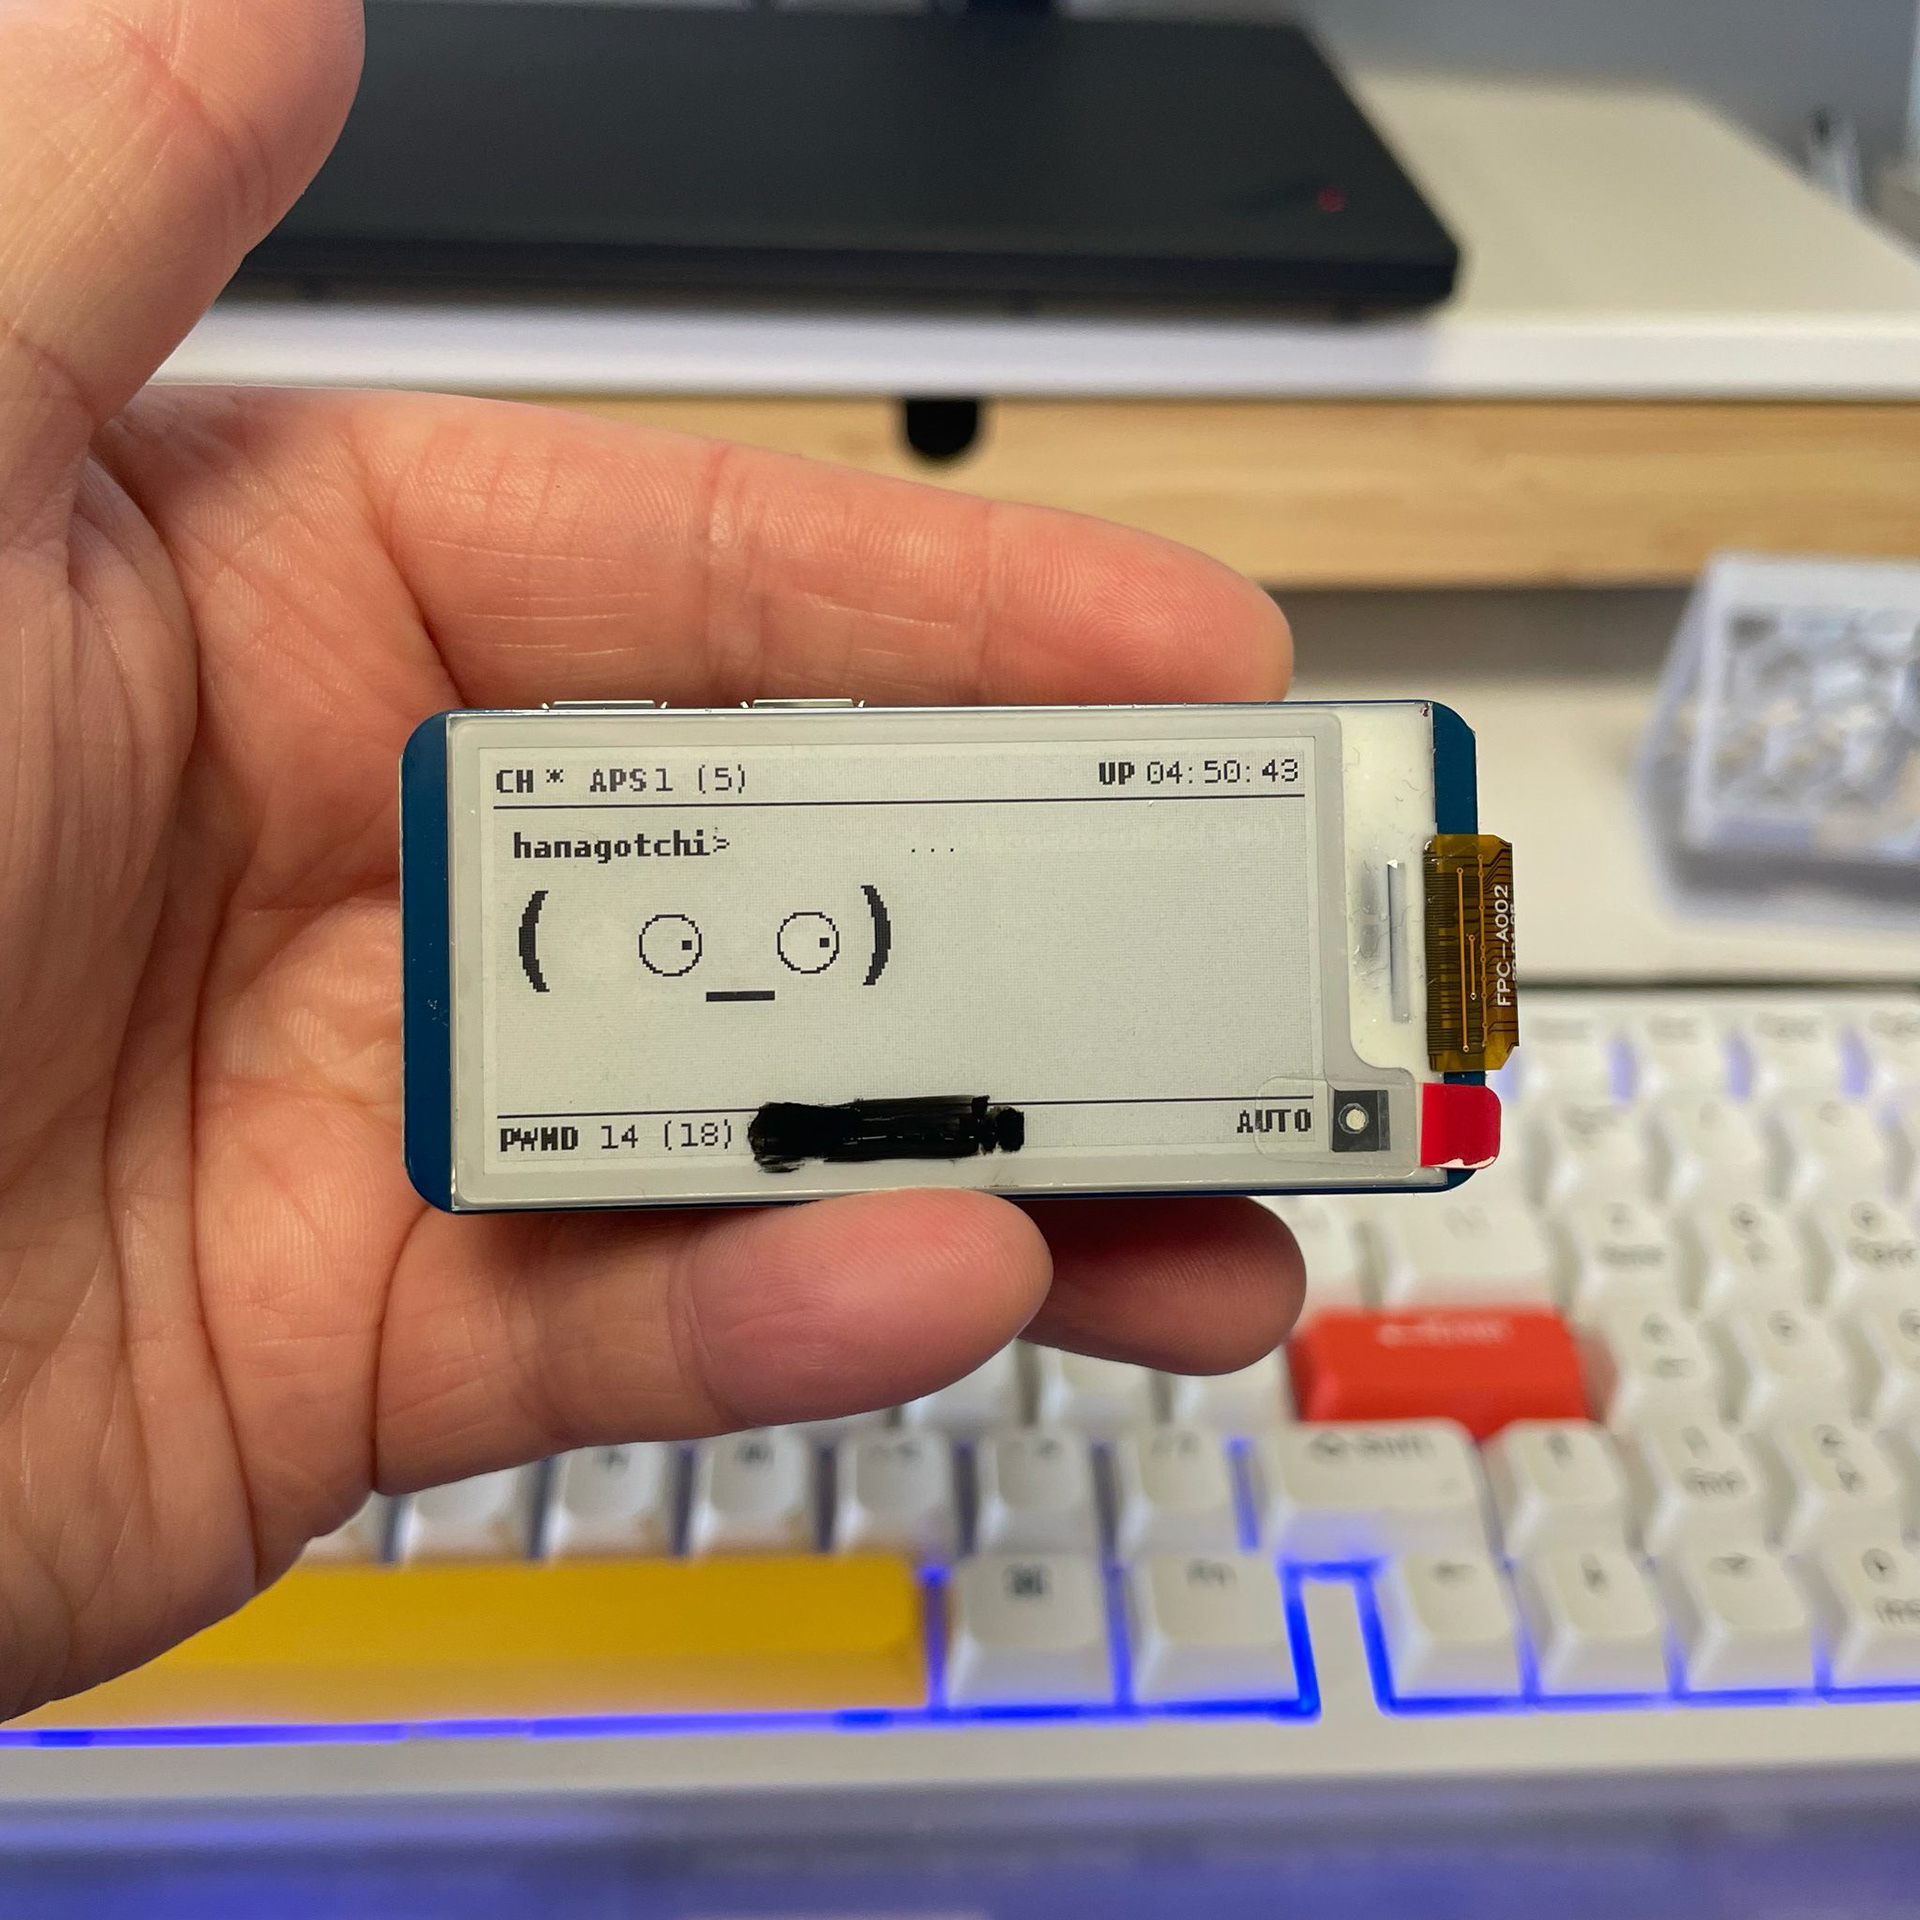
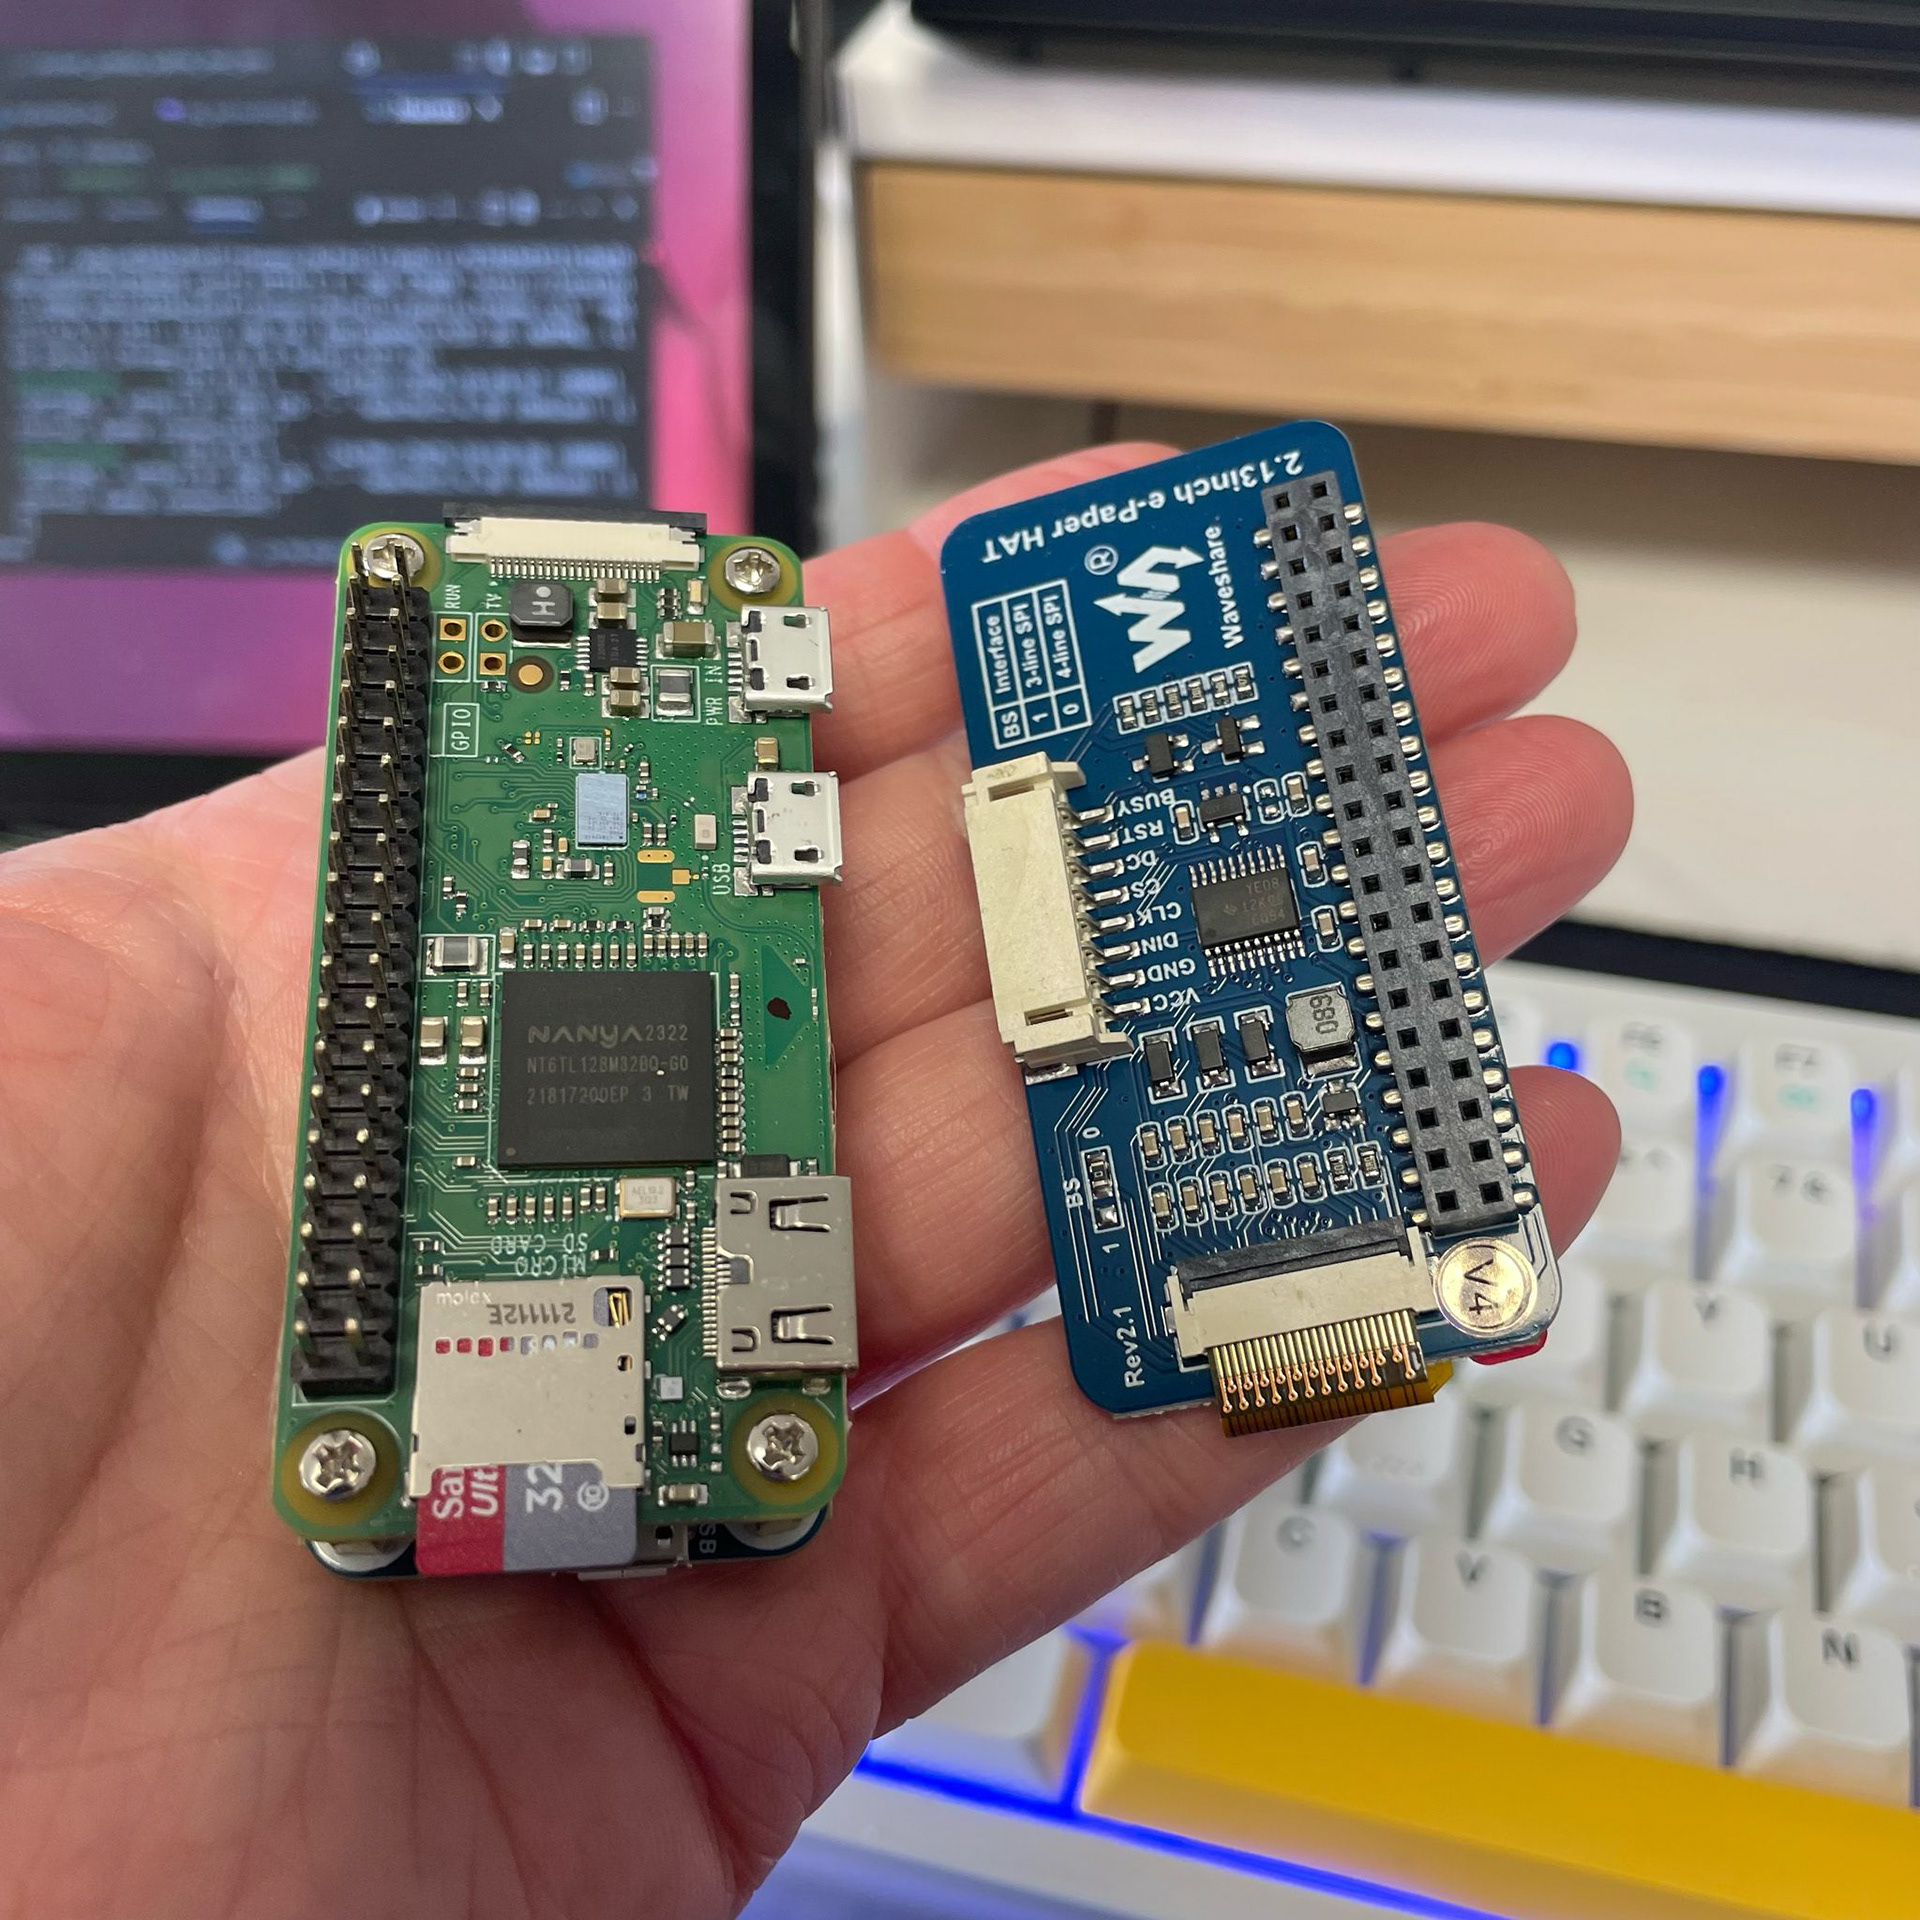
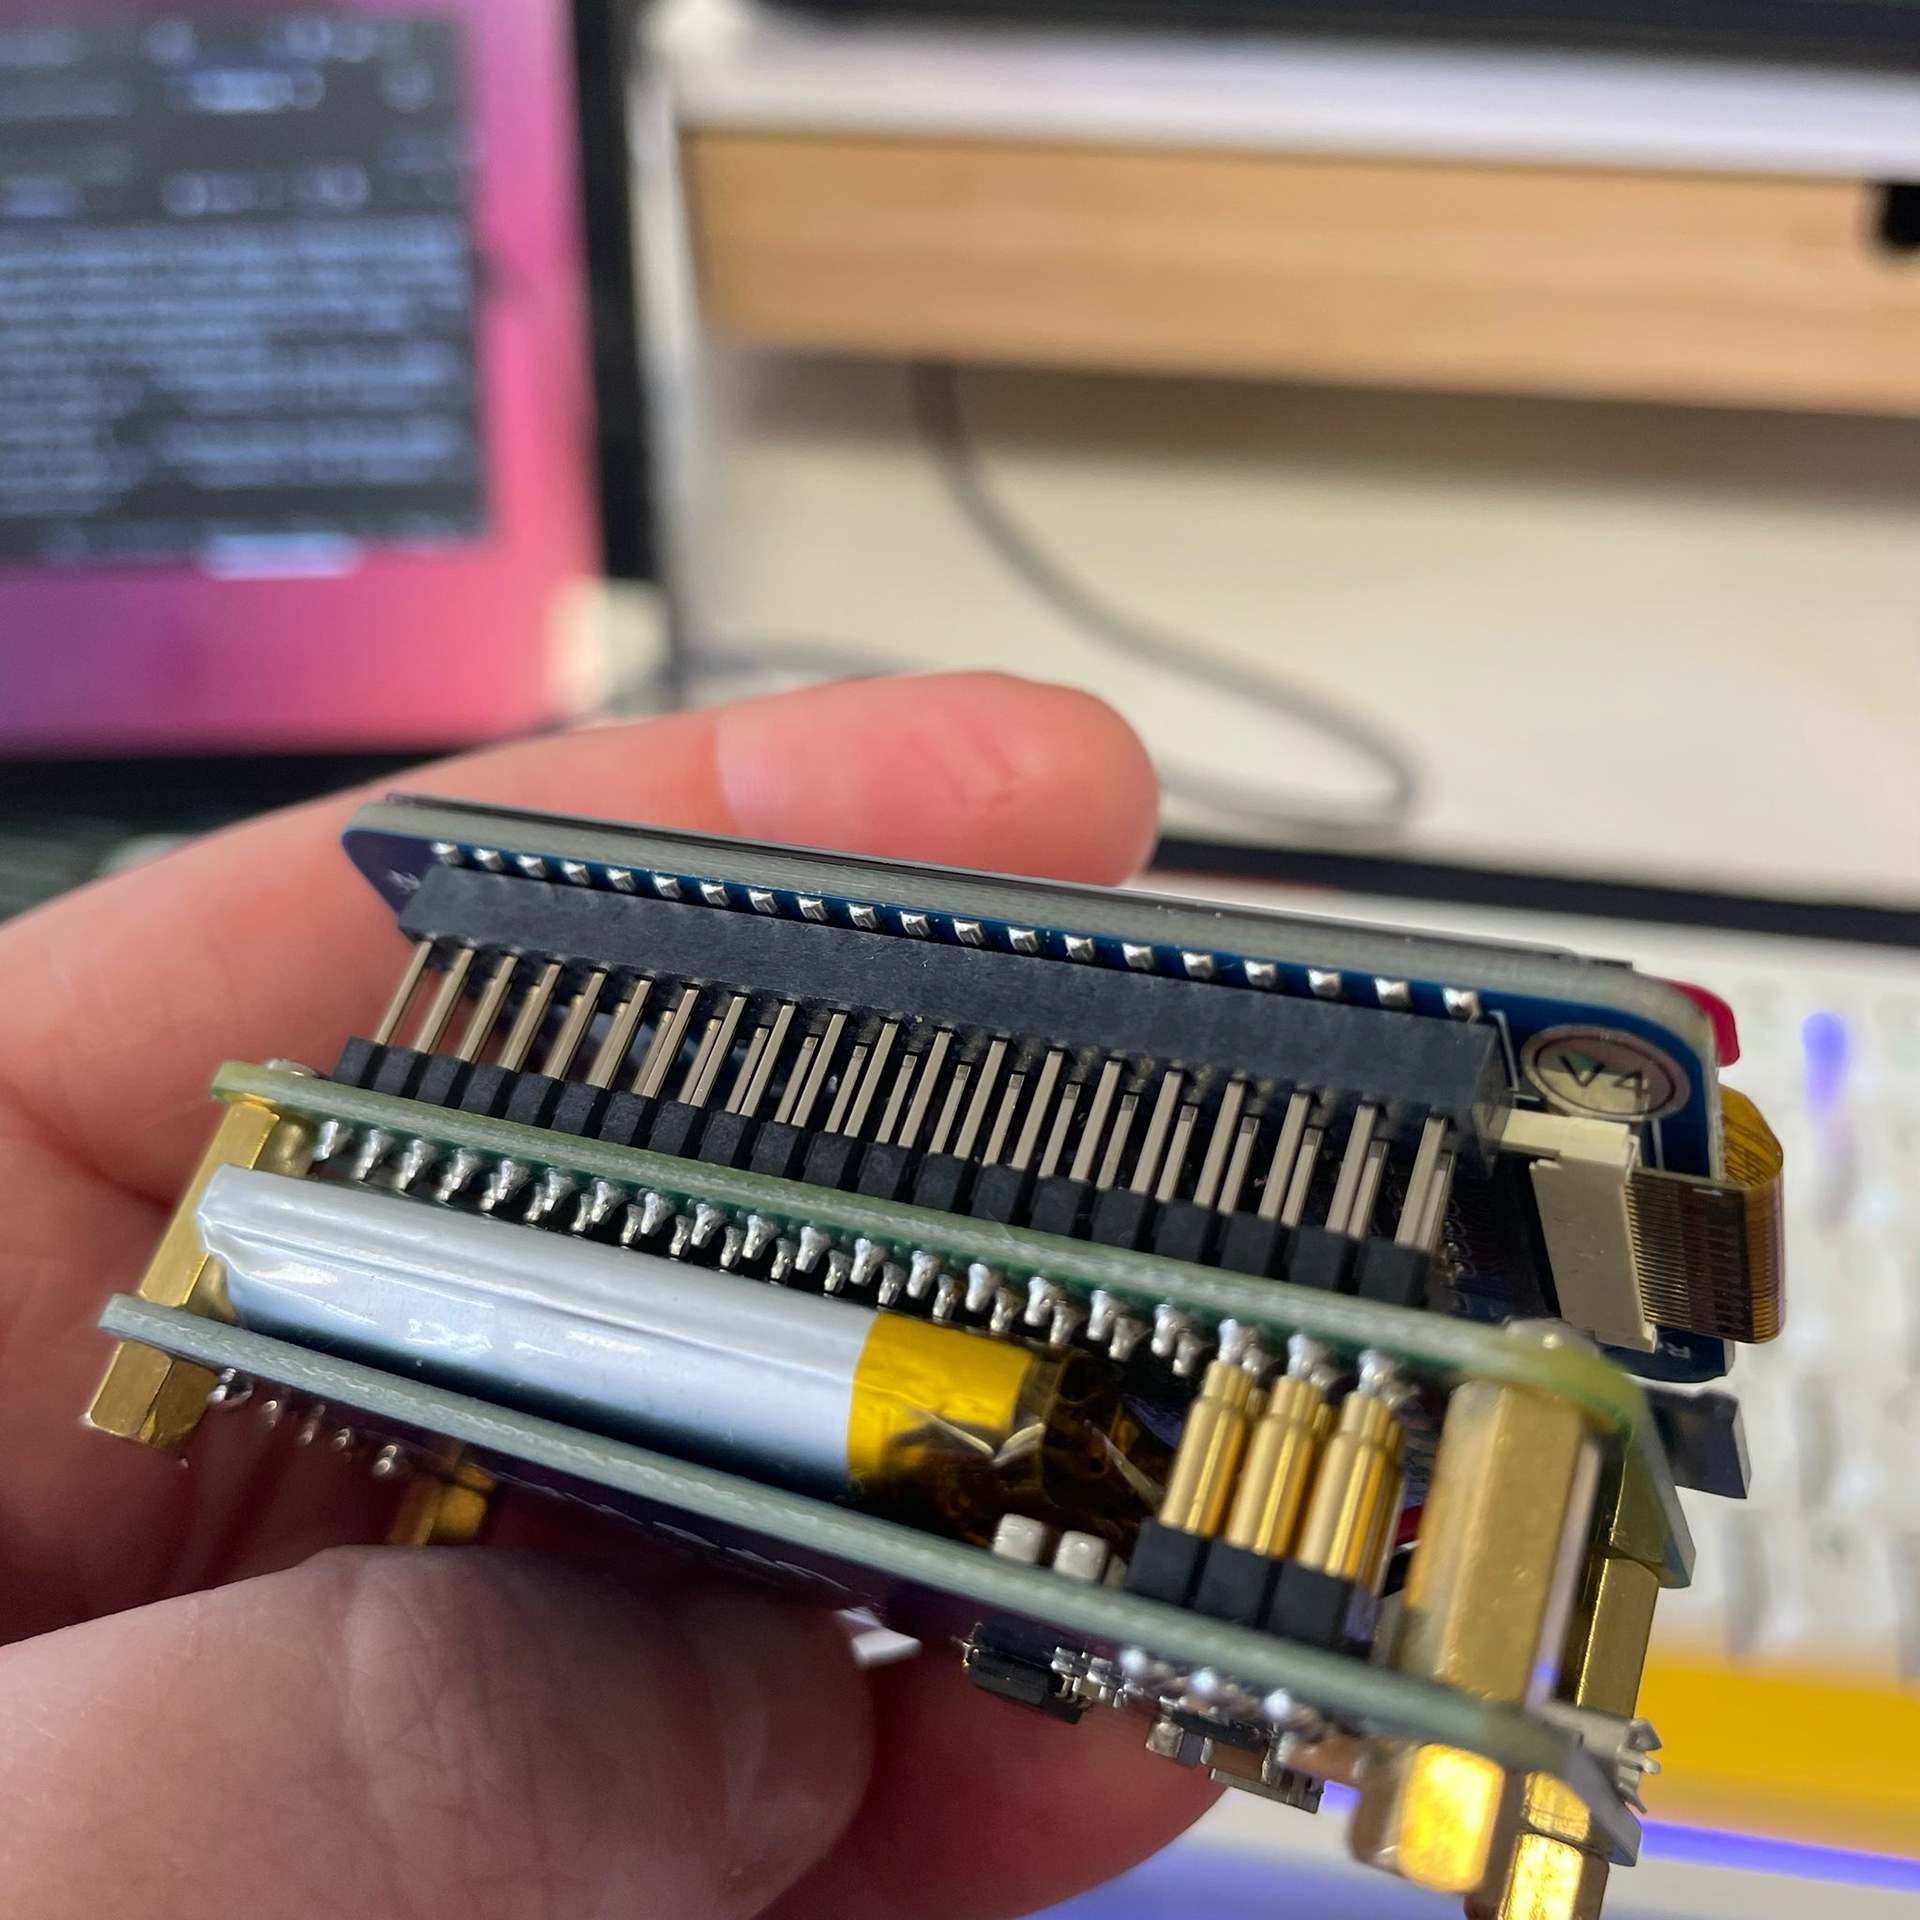
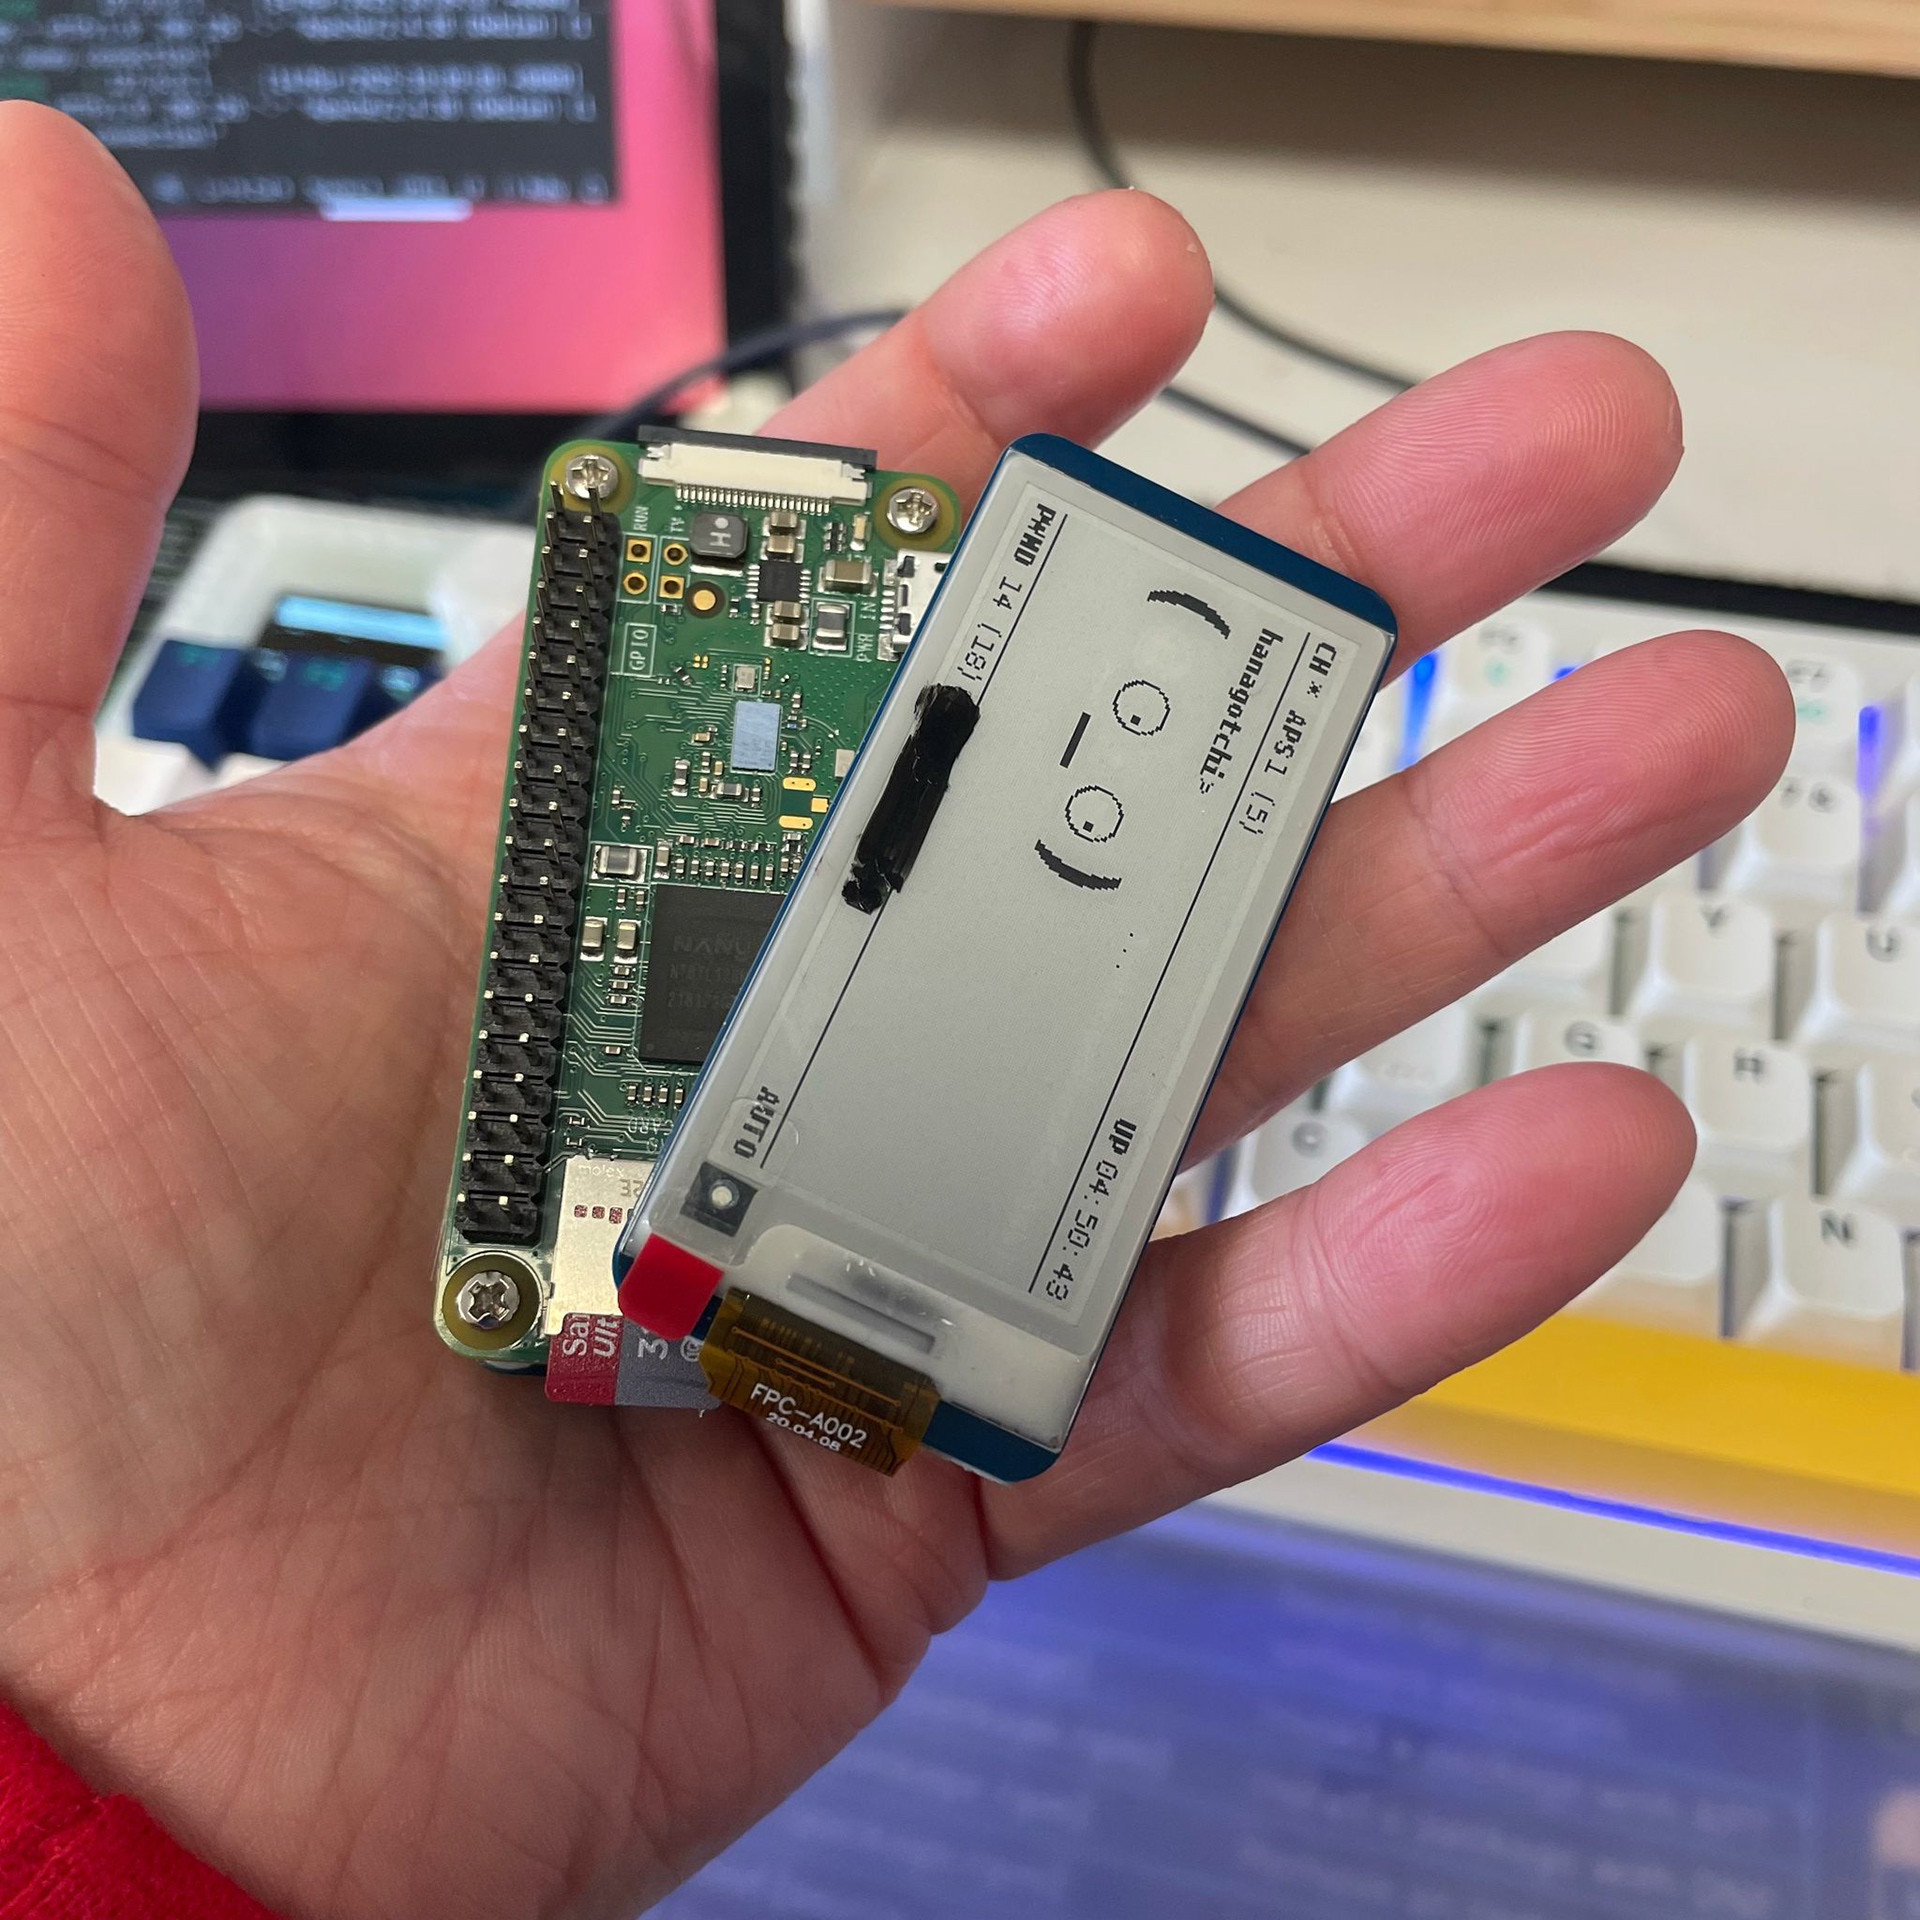
Speaking of videos...remember that YouTuber Talking Sasquatch that I mentioned earlier? Well, he has a bunch of cool videos explaining how to build and use ethical hacking tools. And, of course, he has one on how to make your own Pwnagotchi! In fact, this is the video tutorial I used to make my own Pwnagotchi (please see photos below). If you're wondering what the black line is, I've just blacked out my SSID (aka network name), which is just good practice and would always recommend being careful with things like that. I love the facial expressions that this wee thing has, it's so much fun. In the second of my Pwnagotchi images, you can see the layers that make up this cool wee portable WiFi hacking device. On the bottom we have a battery board attachment (this is one I used) to make it portable (a small external battery would work just as well), in the middle is the Pi Zero W board, and then on the top is a 2.13" e-ink screen. It's important to note that all you really need is a Pi Zero W (you can get one for about 17.00 GBP), and you can still run it perfectly well without the battery or the screen.

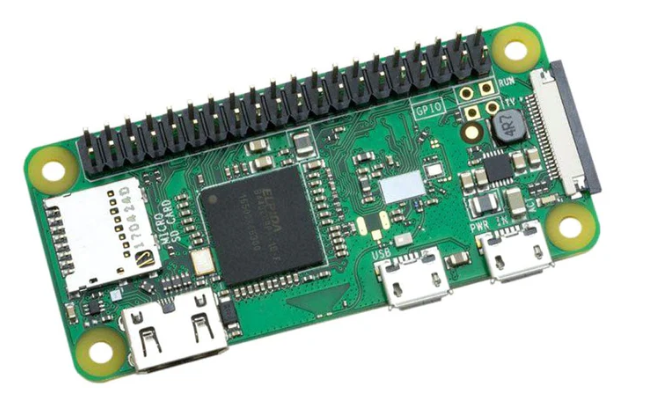
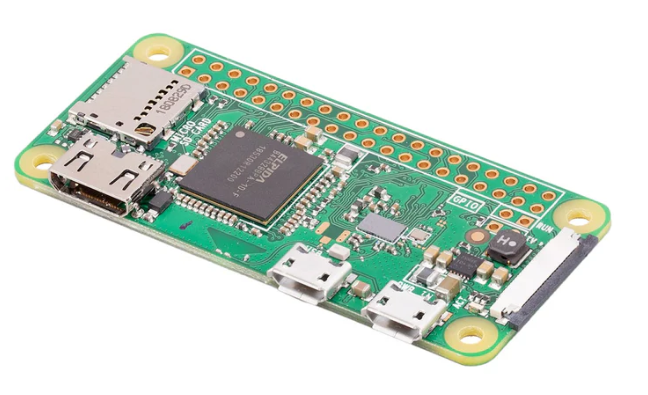
If you're interested in making one of these yourself, I'd reccommend getting one with soldered headers, unless you want to solder them on yourself. This is known as the Pi Zero WH (aka with Wifi and headers). In case you are wondering headers, also known as GPIO pins, are conductive pins that are fixed to the Pi Zero W board with solder to then attach various accessories, ranging from sensors, to screens, to simple LEDs and mini motors. In the images below, you'll see one Pi Zero W with headers and one without.
In the case of the Pwnagotchi, these headers are used to connect the small e-ink screen. In the images below you'll see the front and back of the e-ink screen and the small pin-sized holes that the screen slots into.
I've only recently made a Pwnagotchi but so far I've collected a bunch of .pcap files and run them through Hashcat. I haven't been able to crack any yet, but I plan on continuing to explore it and run it against a larger dictionary of passwords. However, these processes can take a long time and quite a bit of processing power, so I need to give it more thought. Again, there's a lot more detail I could go into, but in this blog my main aim is to let you know that these things exist and the resources and starting points that are out there if you're interested in exploring any of this in more depth.
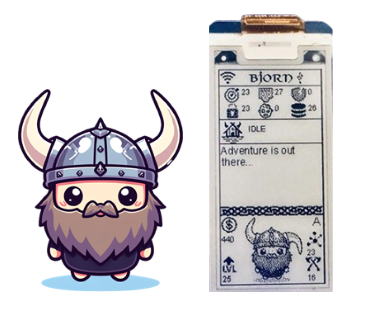
Bjorn Cyberviking
Source: https://github.com/infinition/Bjorn?tab=readme-ov-file
I'd like to talk about one more Raspberry Pi based ethical hacking tool. Well, actually it's a personal network security PEN-testing tool! It's called Bjorn Cyberviking:
"Bjorn is a « Tamagotchi like » sophisticated, autonomous network scanning, vulnerability assessment, and offensive security tool designed to run on a Raspberry Pi equipped with a 2.13-inch e-Paper HAT."
Bjorn is based off of the Pwnagotchi but with a key difference. The Pwnagotchi is designed to look from the outside-in whereas Bjorn looks from the inside-out. When you set Bjorn up, you give him access to your local network, and he'll run security scans and identify any vulnerabilities in your network. Plus, it's so cute, the wee viking is amazing.
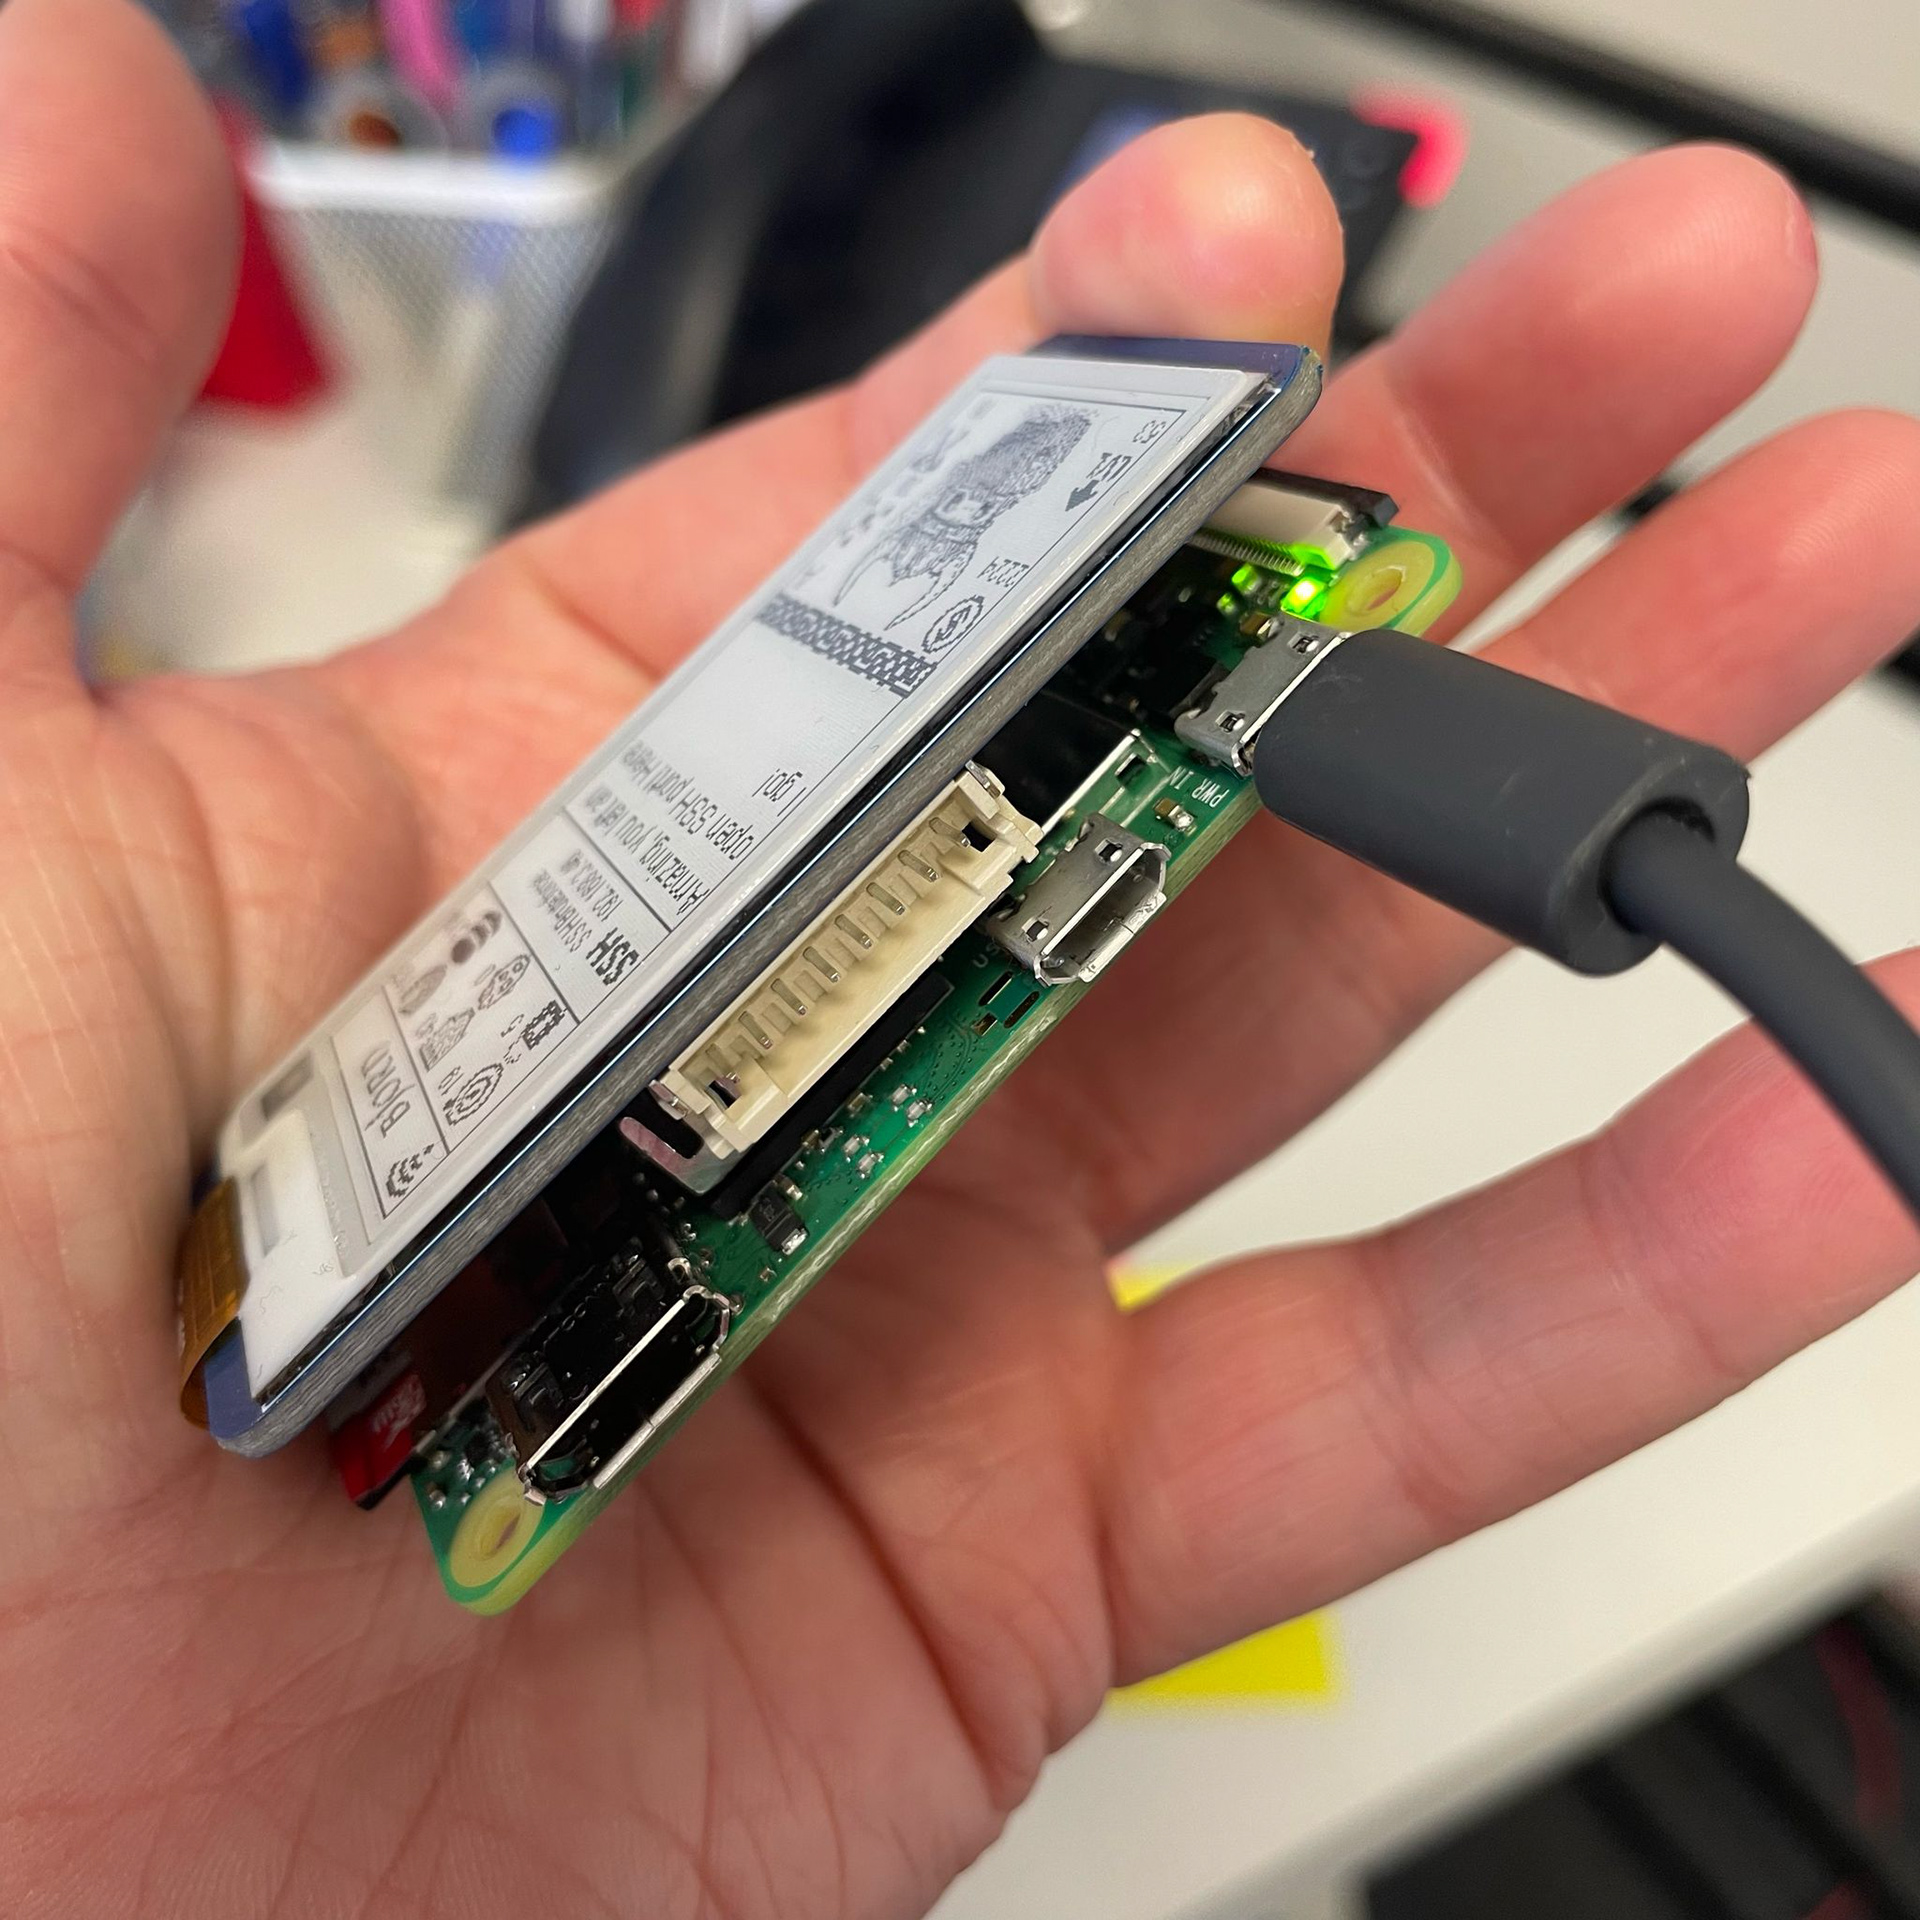
To build one of these you need a Pi Zero W (or 2W) and the 2.13" e-ink screen, so the same hardware as the Pwnagotchi! If you're interested in how this tool is set-up, please refer to our friend the Talking Sasquatch for this ace tutorial. Again, I followed this tutorial to make my own Bjorn Cyber-viking (please images see below).
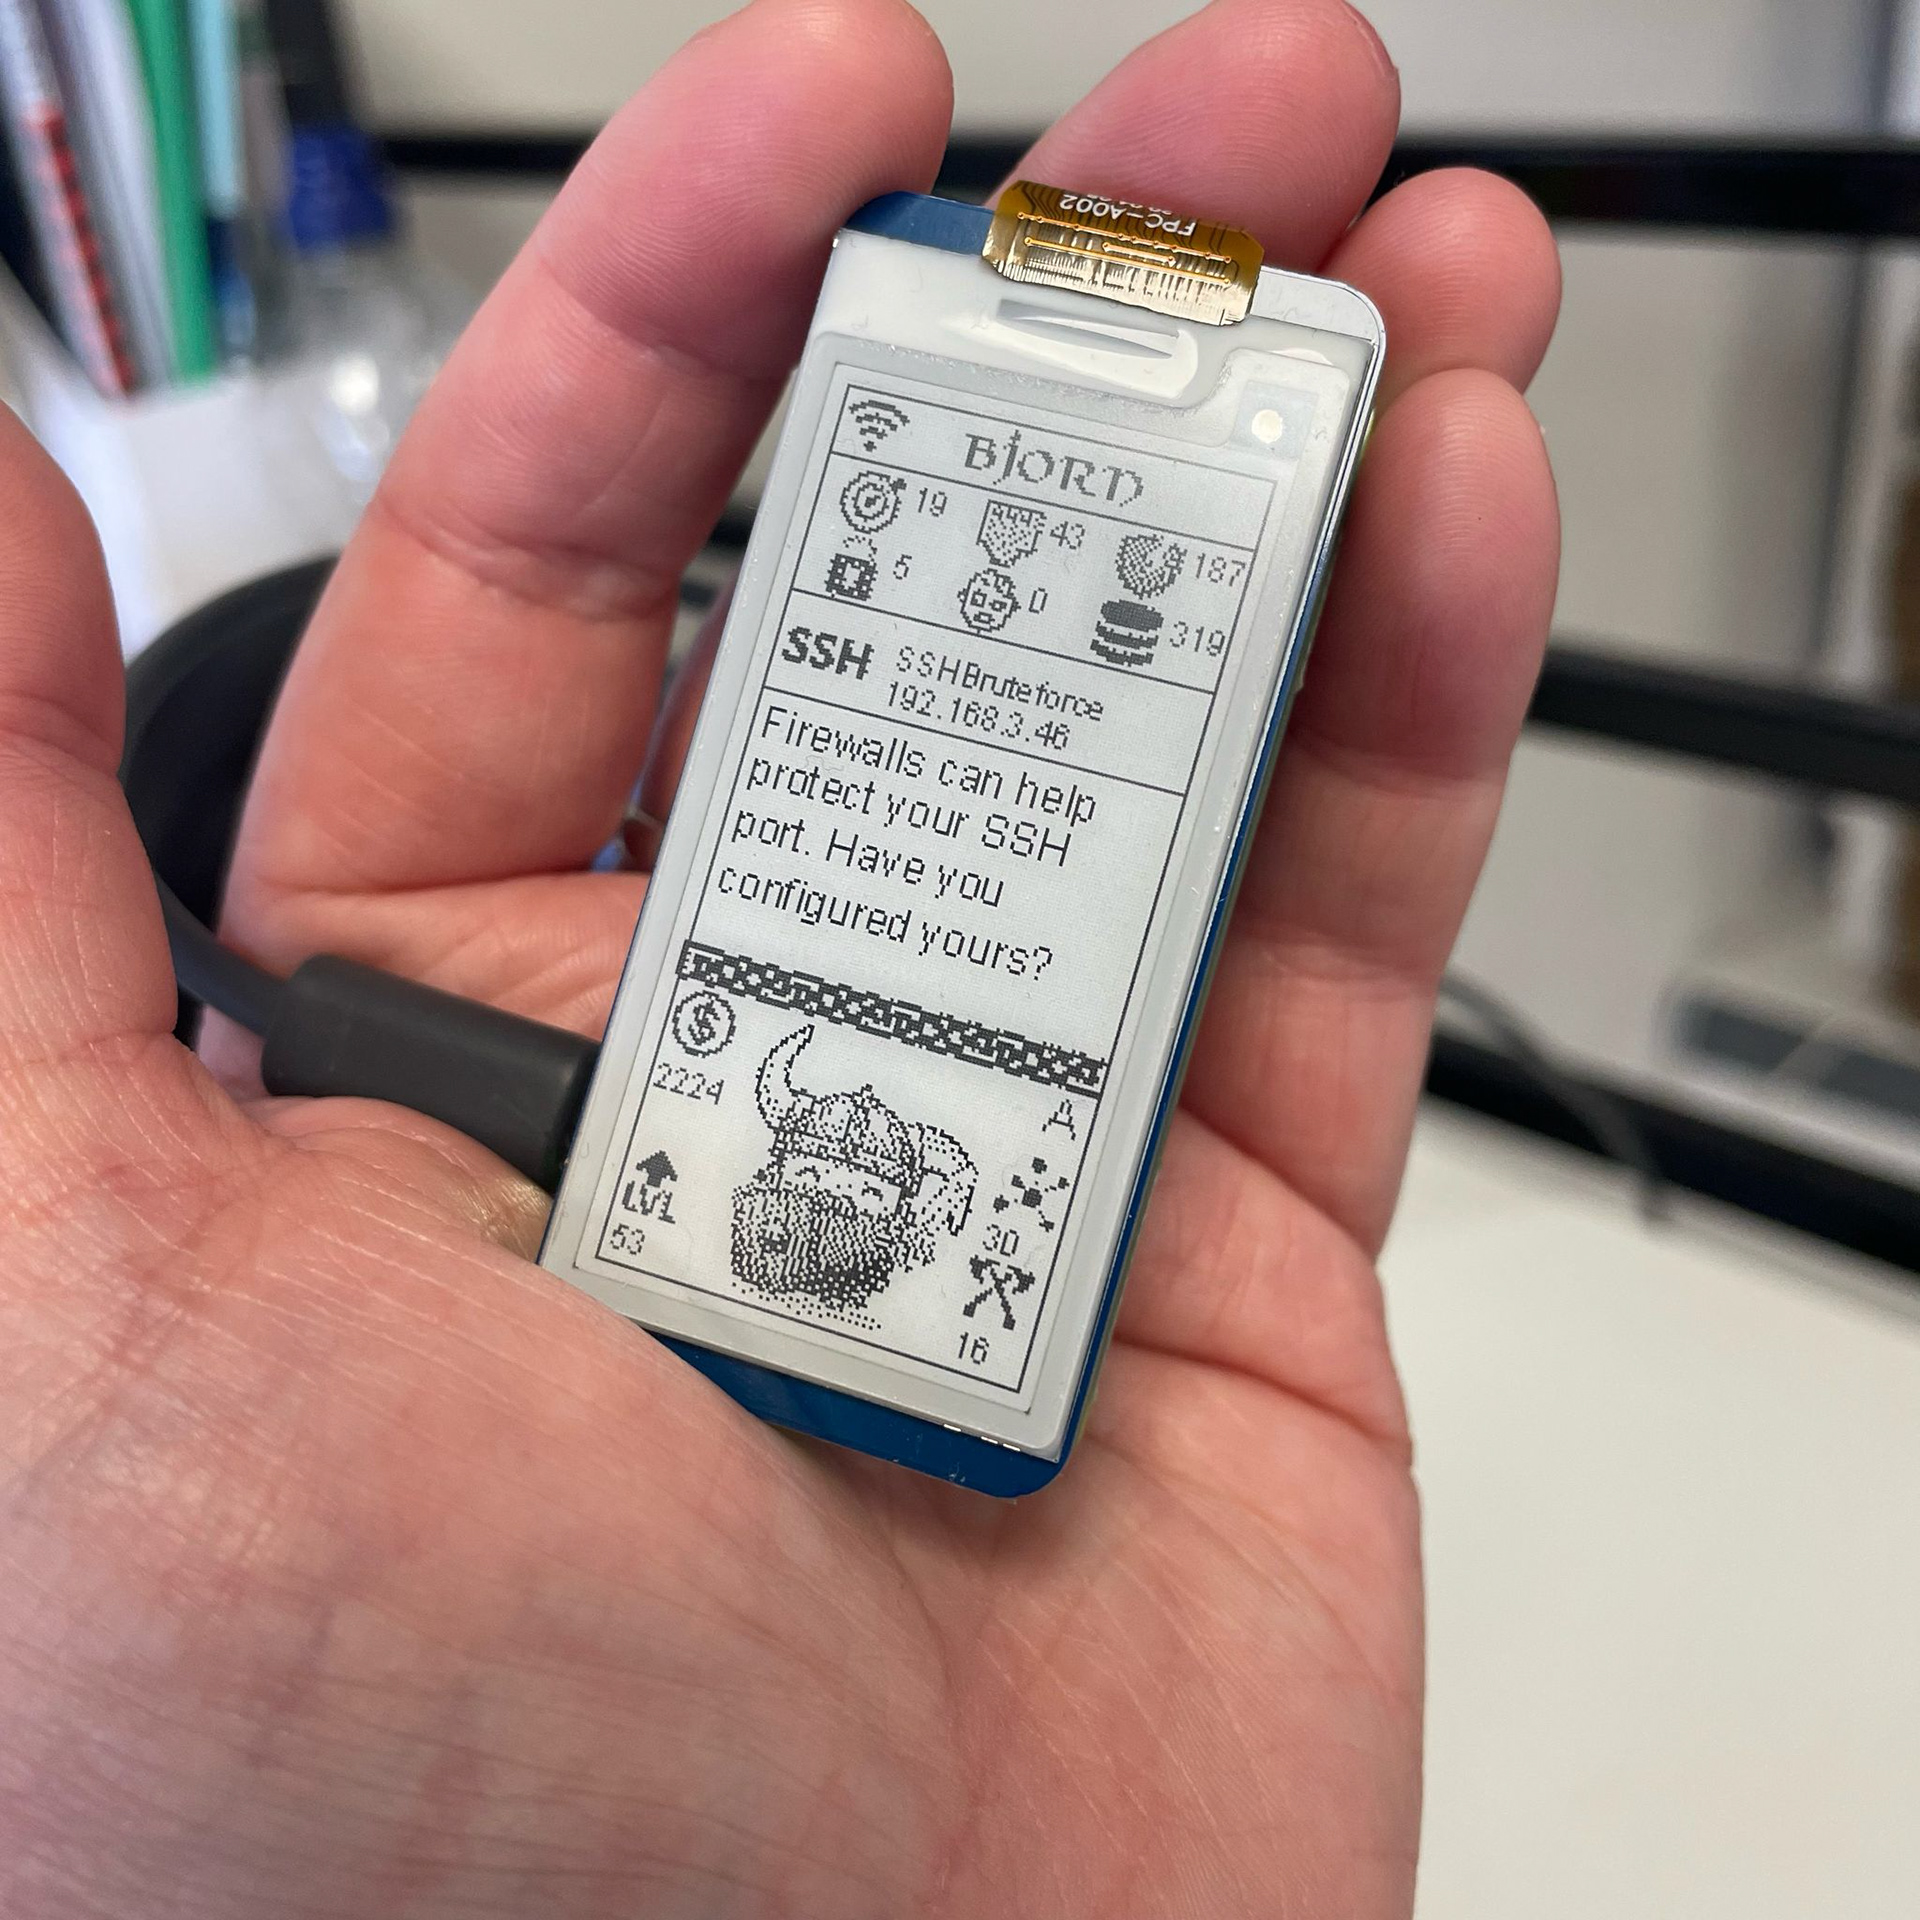
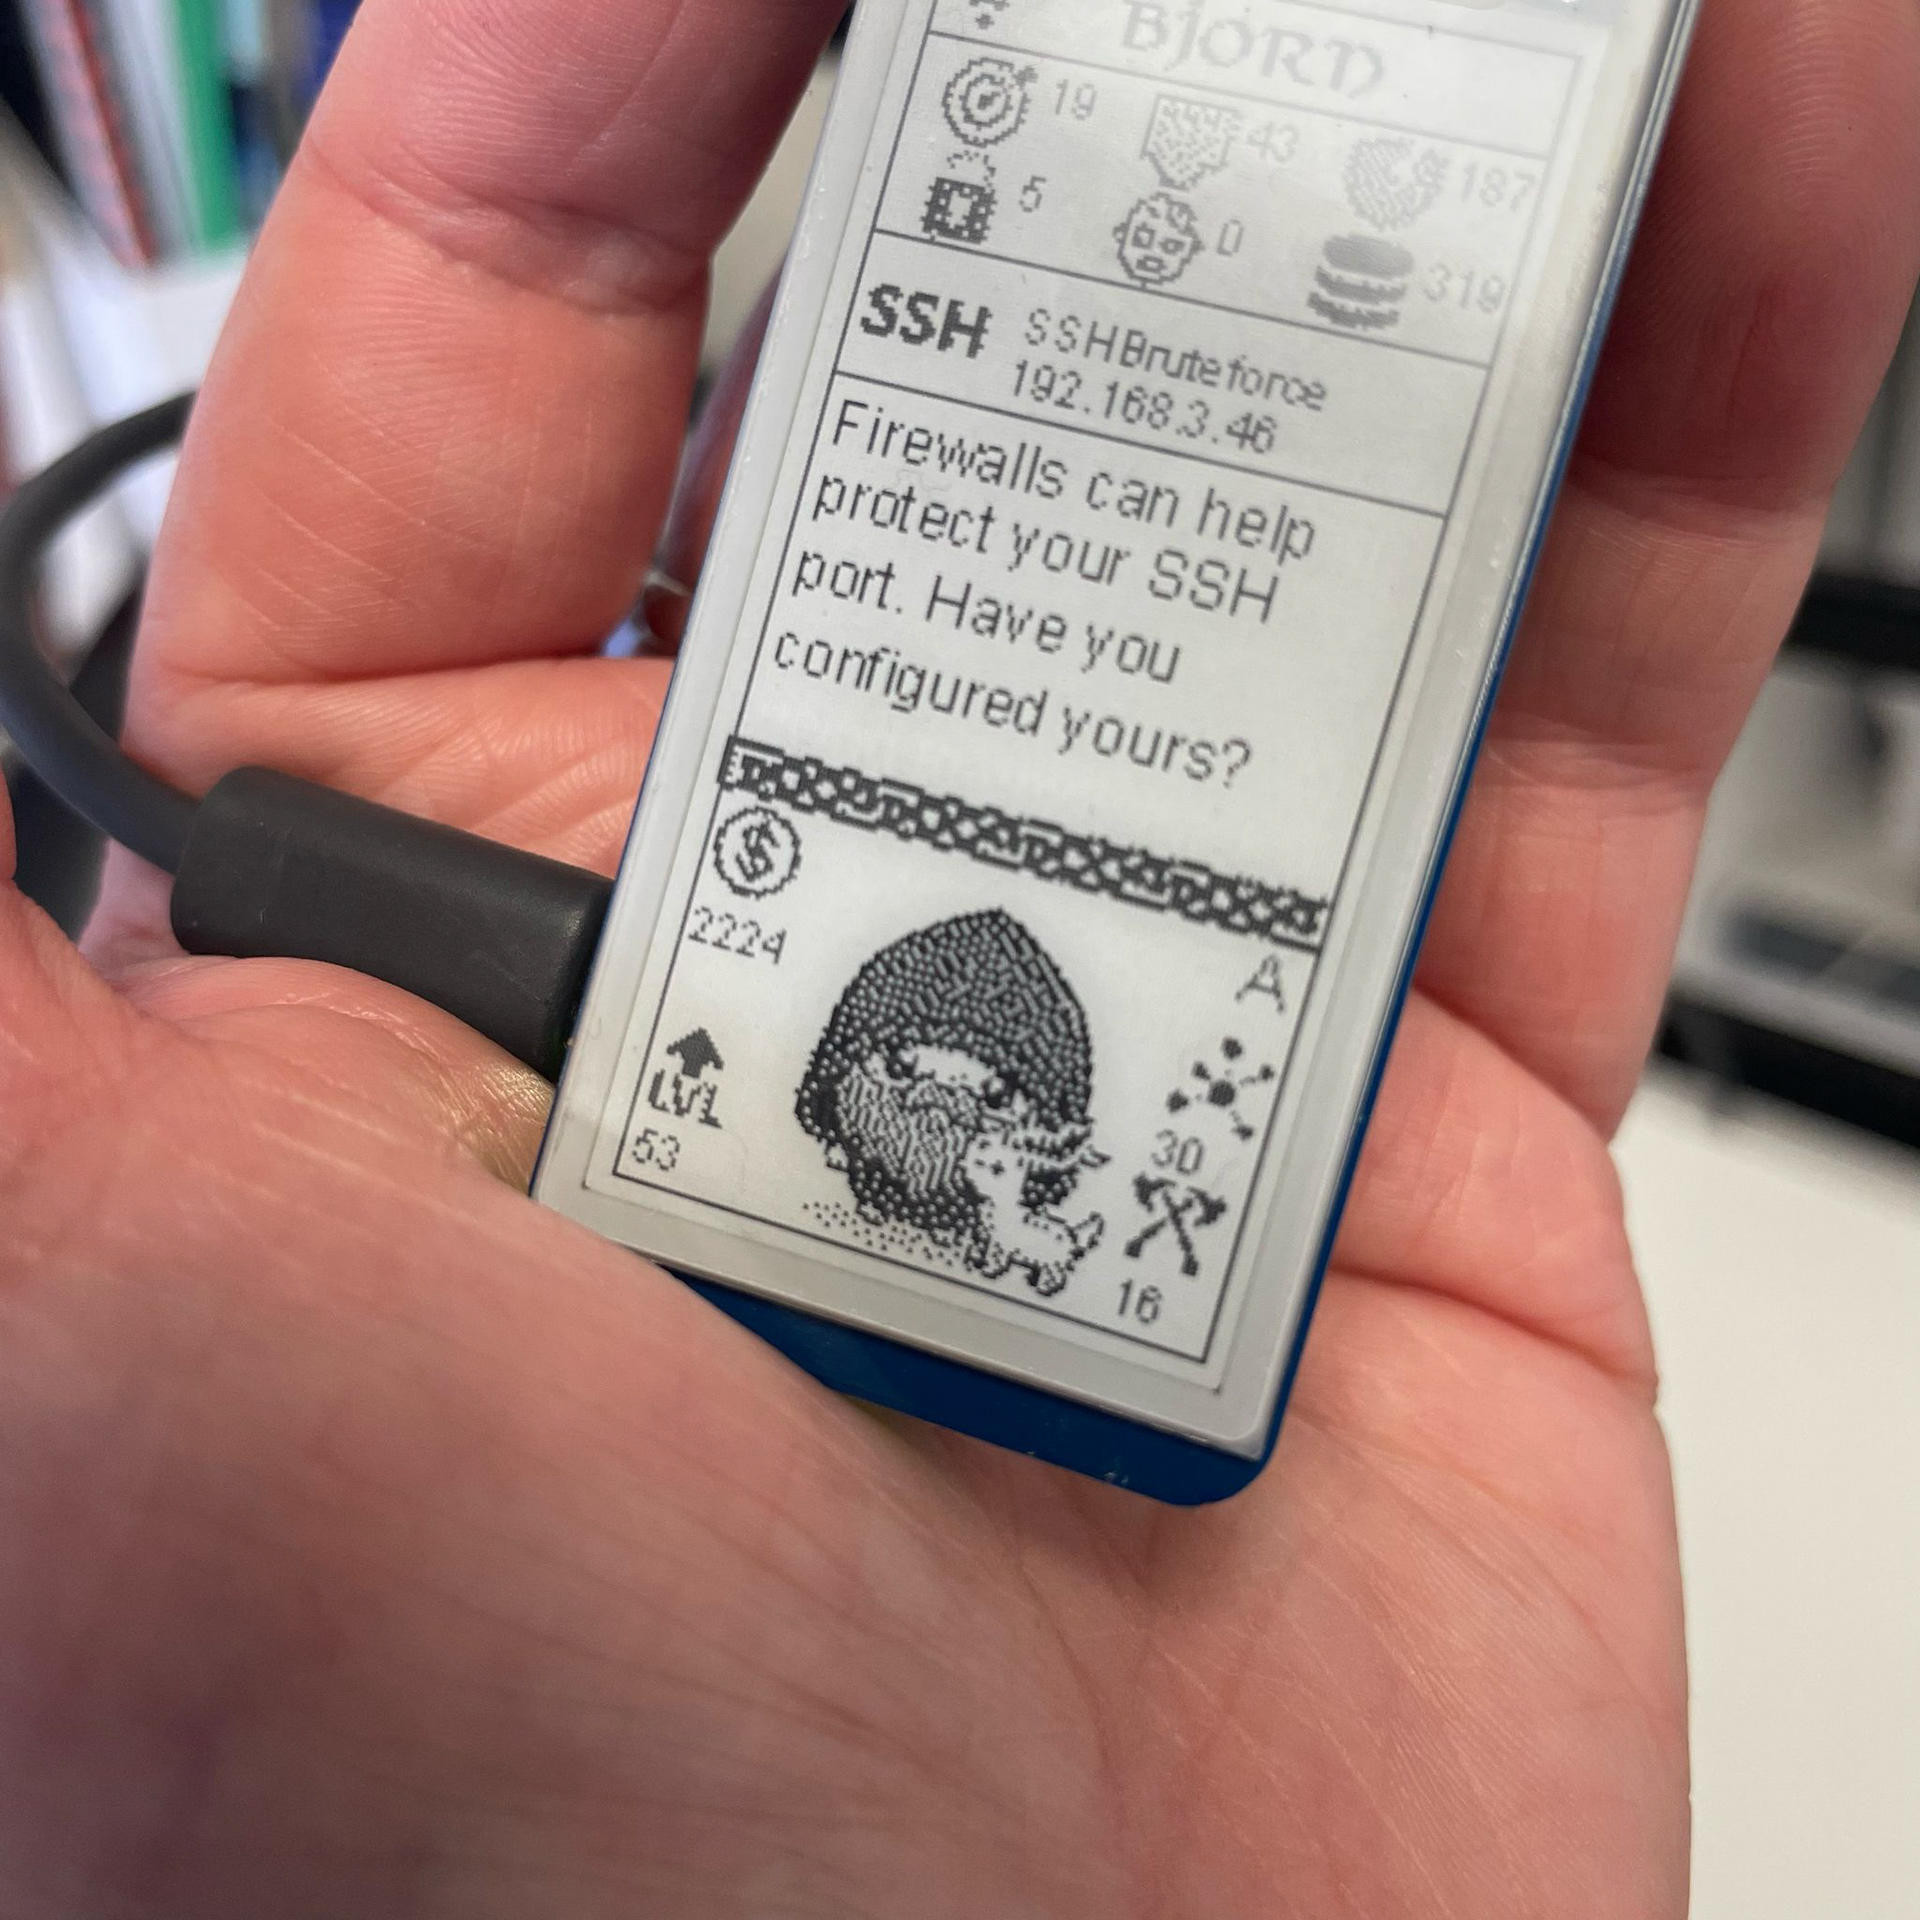
I got permission from my boss to run this on my work's network and it has already proved useful! It identified an open Telnet port that shouldn't have been open. Telnet is an old protocol and isn't really used much anymore, and therefore wasn't being used for anything. But it was an open, unused port, and it's good practice to ensure ports like that are closed. SSH (Secure Shell) is the protocol that is now more commonly used (please see the link above for more info on this as well). SSH is used to securely and remotely access other computers via the terminal (the same one we covered earlier). Below are some more pictures of the construction of Bjorn. You'll see that it's the same as the Pwnagotchi, with the only difference being that Bjorn is plugged in to provide power and doesn't have a portable battery attached to it like I had for the Pwnagotchi.